We currently use the shower, Brunner Aquafresh 2.0, in our Caravan instead of the built-in shower with the boiler to reduce the risk of legionellae and to conserve power.
We heat the water with a 2000W immersion heater which takes around 25min to heat the water to 43°C from 15°C (see the post linked above for more details on time and power requirements). And make sure to stir the water after heating before use.
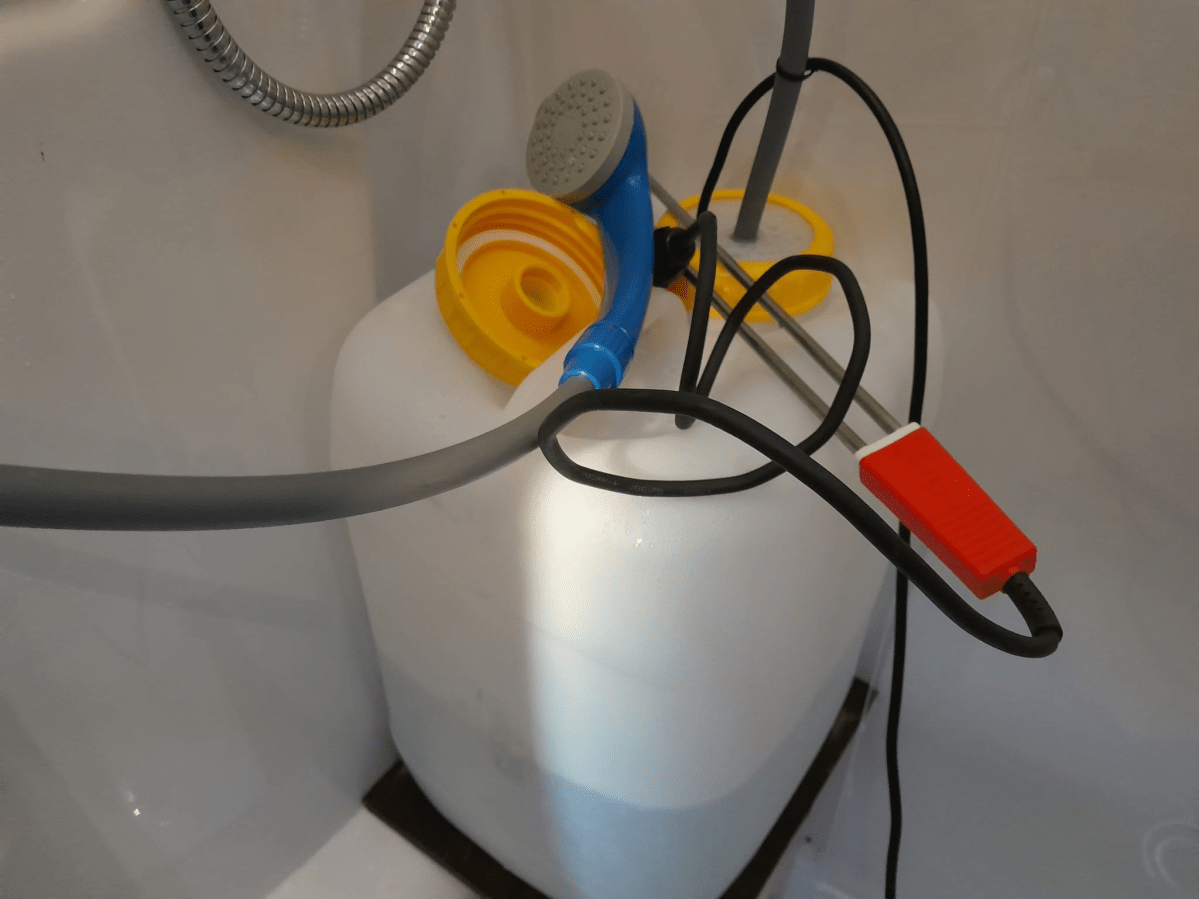
The water is kept in a DIN96 20l wide-neck container from Comet with a special dust 2-hole cap to fit the hose and the elecitricity cable into it. The pump itself has a standard 12V car/cigarette plug that connects to a USB-C trigger board that takes it power from a USB-C power bank with Power Distribution (PD) 2.0.
Everything is kept within a 30mm PIR tube and glued together with hot glue. This does not look to nice but it works. To further “water proof” the device I keep it in a plastic zip-lock bag with the opeining upside down. See below for an even easier option for this.
The on/off-switch on the shower itself is not waterproof – but until never got too much water to produce a short.
To actually get the hose and the electricity cable through the plastic cap of the container I cut away the switch (as it could not be opened) and connected a new one (from Steffen, bought at Landi for 1,50 CHF).
The power bank must be able to deliver 3A @ 12V (the pump has a nominal power consumption of 35W). Water pressure is ok, but not great. Two people can consecutively shower from a 20l container (without washing long hair, of course).
Video: Quick review of our 12V USB-C mobile shower
We also use it in our cars as a mobile shower. On the road we only have a 1000W immersion heater, so heating up the water takes twice as long. But in the summer the initial temperature is much higher so it slightly compensates the total time needed.
UPDATE: instead of going through the hassle to build a USB-C to 12V converter yourself, you can also buy this item from Aliexpress. It is a sealed USB-C to 12V converter. It is much smaller than the tube-based device and costs only around 5CHF, but has no fuse.
Note, that there is a version with and without converter. I went for the version with the converter and with a cable length of 300mm.
USB C PD Type C Male to 12V Car Cigarette Lighter Socket, image from aliexpress.com
So, this will be another rant about online retailers and their delivery strategies in the Highlands.
A couple of days ago, I ordered _the_ missing piece for our barn: a washing machine. Having had good experience with Siemens, I went for a similar model that I already have in Switzerland, the Siemens iQ700 WI14W502GB. I wish I had that iQ. chapeau to Siemens product management and markting.
As I found it relatively hard to find Siemens retailers in the UK for that model, I ended up with John Lewis & Partners. Never heard of them before, but as it seemed they were an official Siemens reseller.
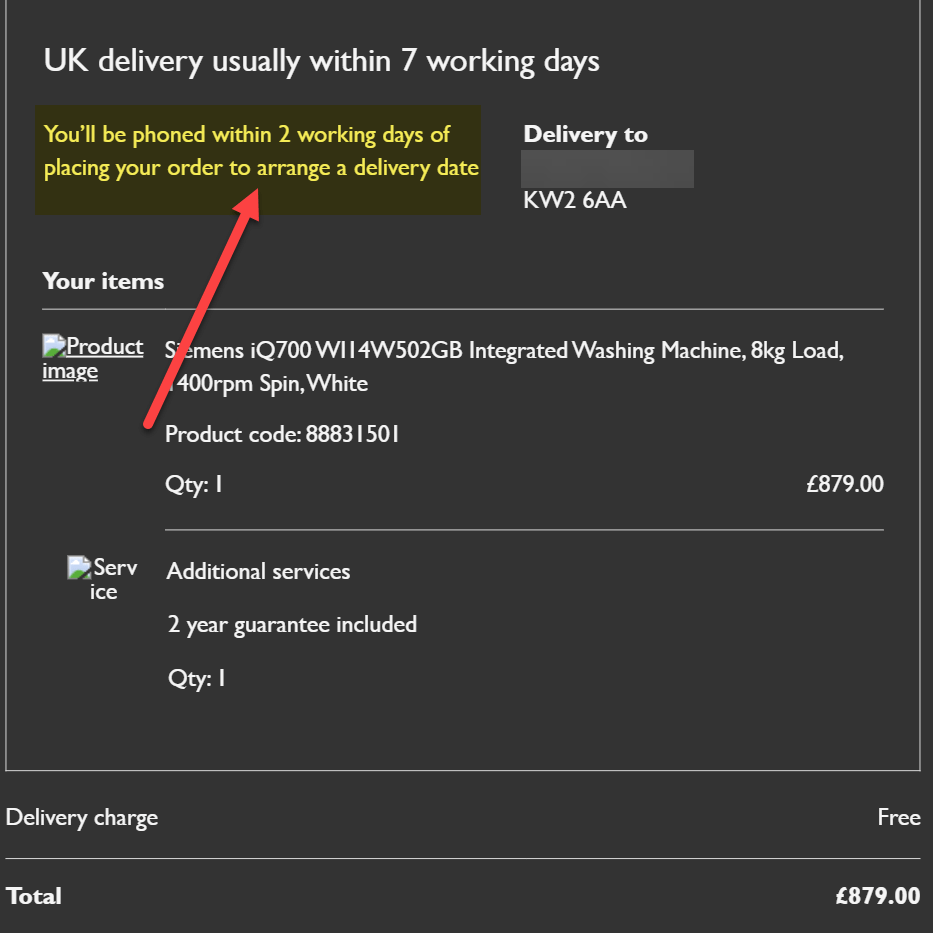
During order and checkout, I was told that the item would be delivered _usually_ withing 7 working days. Of course, the word “ususally” usually leaves room for variance and interpretation. And I got a “free delivery” and assurance they would call me within 2 working days after the order to arrange a delivery date. No “usually” there.
Order confirmation email from John Lewis & Partners
So, what happened next? I never got the promised call, but after a couple of days, actually after 7 working days, I received another mail telling me the item had been dispatched. So, no arrangement of a delivery date.
Item dispatch notice after 7 working days
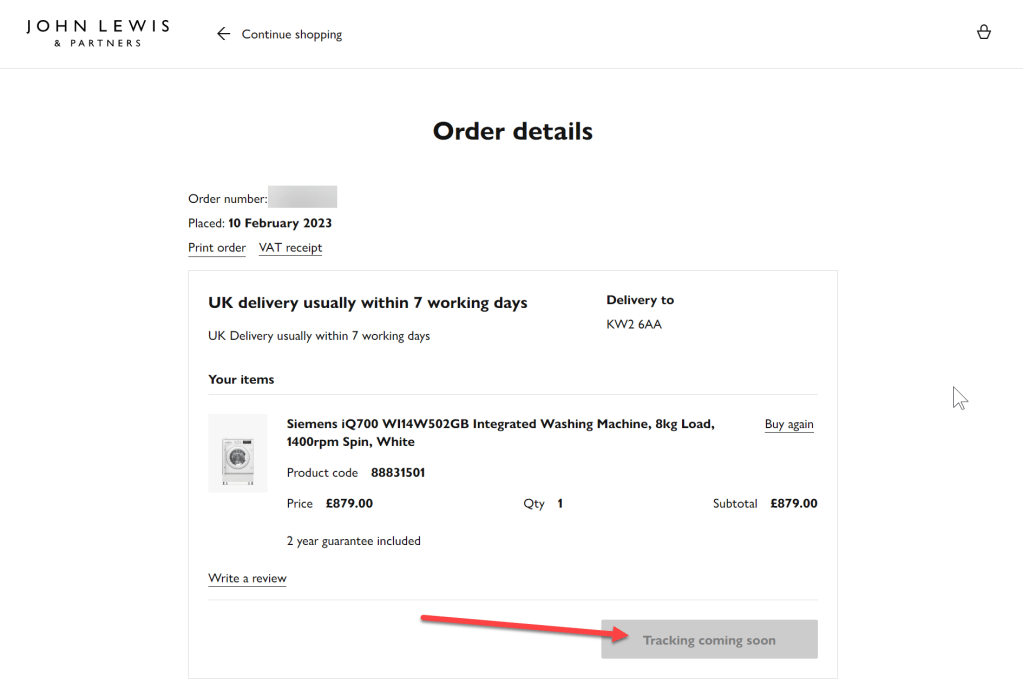
So, I waited another 24 hours as noted in the email to get the tracking link, so I could see in advance when the item was supposed to arrive. No luck that. Every day I checked the link, it only said “Tracking coming soon”.
John Lewis order details and no tracking link
Surprisingly, today I got a phone call from a delivery guy, telling me he was about to deliver an appliance. Unfortunately, I just left the property for some other tasks.
Now, less than 2h later and 10 working days after my order, my neighbour received the washing machine for me – with the tracking information still “coming soon” and me having to move the machine later on to my plot.
I would have thought that online retailers in 2023 could do better. – Hmm wait, I actually know online retailers that do better (for years).
Any “Customer Happiness Engineers” at John Lewis & Partners reading this?
And this is the end of today’s story about the delivery of a washing machine in the Highlands.
While we were building our washroom on the plot, we were thinking of having a hot water shower in there as well. But instead of having a boiler and keeping the water hot for an extended unused time, we were thinking of sth different:
1* immersion heater with a power rating to your liking, such as “Rommelsbacher TS2003” (with 2000W with AC). You can also go for a DC model that can be run directly from a (12VC) battery or DC source. Just make sure, that the heater is not longer than the height of the canister.
1* thermometer, such as “TFA Butter Quark Cheese Thermometer“ I opted to an analogue one going up to 100°C and made from glas instead of plastic.
1* short USB-C to USB-C cable for transmitting at least 36W
30cm of 1.5mm2 some cable
1* plastic bag or similar to fit the power bank and the trigger board
some plastic tape to “seal” the plastic bag
an energy source
How it works
Fill the canister with water (20l max).
Place the thermometer into the canister.
Place the heater into the canister and hook it to the opening of the canister. Make sure the metal of the heater does not touch the plastic or the thermometer.
Power on the heater (either from your battery or your inverter) and wait until the water gets to the destination temperature. For the actual duration see “The maths” section below.
Remove the heater.
Insert the immersion pump of the shower into the canister.
Connect the power bank to the USB-C trigger board via the USB-C cable.
Have the trigger board output voltage to be set to 12V permanently or set it manually to 12V.
Connect the power calbes of the shower to the trigger board.
Have a shower.
The maths
In case you are wondering, how it would take to heat up the water, here is my calculation (with the formula taken from various sources on the internet).
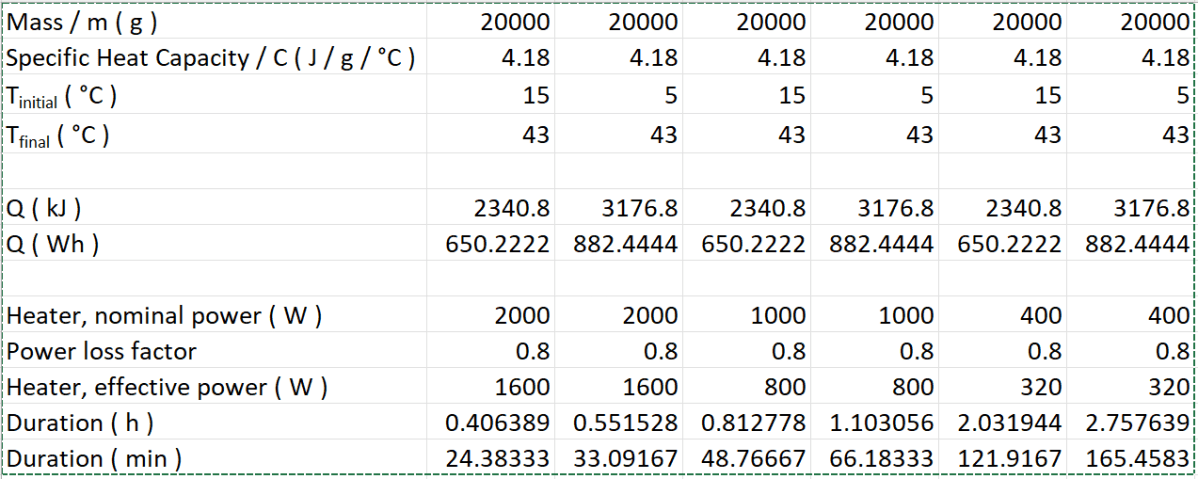
Q = m * C * delta(T)
So in case we want to heat 20l to 43°C from an initial temperature of 15°C with a 2000W immersion heater, we might need to wait for approx. 25min. If we did same but with an initial water temperature, it took us roughly 33min.
With a 1000W immersion heater, the numbers would change to 49min and 66min. And with a 400W we would have to wait 122min or 166min.
The amount of power needed is also shown on the above table. As you can see, it uses between 650Wh and 885Wh. So be careful when using a 12V immersion heater with your 90Ah car battery – don’t …
Conclusion
It quickly becomes obvious that a heater with only 400W will take too long to heat the water. At least I would put it over night into the motorhome, caravan, trailer or wahtever place so it can “pre-warm” a little bit. This might save you between 45min – 60min.
With 20l of water the shower experience will be limited to under 6min on “full throttle”. But with careful “breaks”, I still think the amount of water is sufficient for a full shower (not including washing long hair, of course). And if this does not provide sufficient water, there is always the option to add another 20l.
And: we will post a video with visual evidence as soon as it gets warmer …
The foundation works for our barn are progressing, so hopefully the barn will be finished by the end of the year and we can start setting up a workshop – and our main electricity installation.
Last year, when I did a rough planning of our electricity needs and installation I decided to go for a battery system from Pylontech or BYD. But now, it is very hard to find a reseller or dealer that can actually deliver these batteries in the UK.
So our current plan is to “build” the batteries ourselves. And thanks to Stuart Pittaway (support him on Patreon, he created the DIYBMS) I found Fogstar, a company that imports and sells Eve battery cells. And this is where I ordered my 112 Eve 3.2V 280Ah 0.5C cells – to be delivered in late November (hopefully).
In the following sections I will explain why I ordered these cells and how I will connect them. So let’s start …
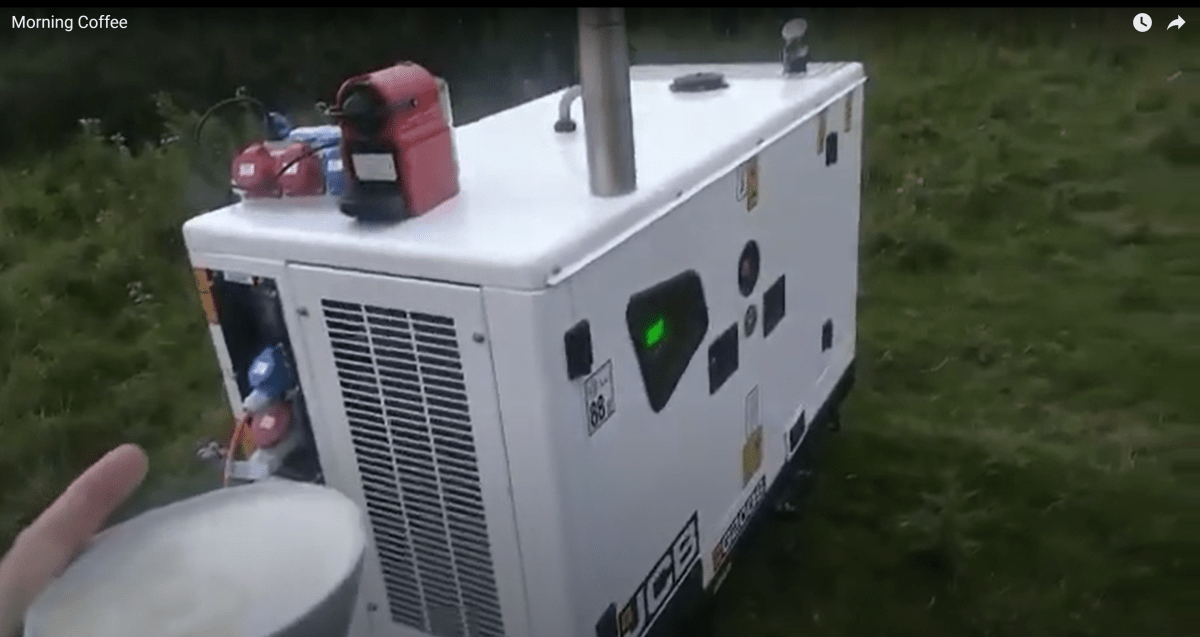
The generator
Our system will be completely off from the main electricity grid. We only have a JCB G20QS as a backup generator that can produce a constant power of 20kVA or 14.4kW. Running this generator at around 75% capacity is the most energy efficient way and will consume roughly 3.29 l per hour. This means I will have an output of 10.86kW and get a 3.3kW per litre of diesel.
Consumption calculation for JCB G20QS
The load
Despite my previous thoughts I will run the whole system on a single phase. This is due to the nature of “electric showers” in the UK all being single phase and using power between 8kW and 10.5kW. As I will use eneergy from the batteries for heating as well, I plan for a daily power consumption of 16kWh per day with a peak consumption of 12kW.
The batteries
I want to be able to run at least 3 days completely on batteries, resulting in a storage capacity of 48kWh to 64kWh.
Currently available LiFePO4 cells range between 280Ah and 320Ah and have normally a C rating of 0.5C. So if use 4 parallel batteries with 16 280Ah cells each I will end up with a capacity of 4* 16 * 3.2V * 280Ah = 4 * 14’336 VAh = 57’344 VAh.
The maximum current draw would be 4* 140A = 560A with a resulting available power between 28’672VAh and 22’400VAh (when the cells run at 2.5V just before shutting off). As it is hard to find DC breakers for that current rating, I actually restrict the maximum draw to 125A per battery giving me a draw of maximum 500A and a resulting available power range between 25’600VAh and 20’000VAh. This will give me at least 16’000Wh.
Side note: I was not sure, if I should really go for LiFePO4 batteries, as I do have the space and storing weight is not a problem either. But in the end I opted against lead acid batteries as the LiFePO4 has become so much cheaper. Temperature is not a problem for me in Scotland as it does not really get cold and the batteries are not outside below 5°C.
And the main reason why I went for the 280Ah cells (instead of bigger ones) is, that
( a ) I do not need the bigger capacity of 4 batteries with larger Ah, and
( b ) I see the remaining power of the system, when one battery is offline, as too little with a 3 battery system (instead of a 4 battery system), and
( c ) I would need bigger circuit breakers (with the 304Ah cells), and
( d ) I can still draw 15’000VA with only 3 batteries on the 280Ah setup.
Comparison between 280Ah, 304Ah and 320Ah cells
So the whole system is wired as a 4p16s system (instead of a 16s4p). Or was it the other way round? I always mix it up …
The inverters
I will use 3 parallel connected Victron MultiPlus II 48/5000/70-50 inverters that can deliver a constant power of 15’000VA or 12’000W (and peak up to a total of 27’000W).
One good thing about the model 5000 inverters is that they are relatively energy efficient (rated at 96%) and use only 18W per inverter. So during normal operation I might be running only 2 inverters at a time (with 36W), but I can easily add the 3rd inverter (with a total 48W). And given the output the batteries I could also add a 4th inverter later, if I really needed more peak power without having to add another 16s battery.
The connections
For this system I will use the Victron Lynx DC distribution system that is rated for 1’000A. The main fuse in the Lynx Shunt VE.Can (which is also rated for 1’000A) will run with a 500A fuse. The shunt itself is necessary as the Victron Cerbo GX controller cannot handle more than a single BMS. The shunt will tell the GX via the CAN bus the load level of the 4 batteries and thus hiding the individual batteries from the GX.
Charging will be done via the 3 MultiPlus inverters where each inverter can handle a 70A. This is slightly under the 212A that the generator can produce at 75% load (see above).
This means we would theoretically run the generator for 320min to charge all 4 batteries completely (needing roughly 17l of diesel).
If we only used the generator to charge the batteries for the whole year, we would end up with around 540h of running the generator, costing us 2’040GBP (at a current price of 1.15GBP per litre).
Side note: Though the generator is able to run constantly 24/7, the service package covers an 800 h per year. So even with these 540h we are well below this threshold.
Discharging
As already written, I restrict the discharge per battery to 125A, but the realistic discharge current should be between 75A and 98A per battery on full load (so I could actually also use a 100A DC circuit breaker). These number take into consideration the loss of the inverter, reactive power and the minimum cell voltage before shutdown.
With these parameters we could draw 12kW for a period of roughly 3.6h.
The Eve cells claim to have a lifetime of 5’000 cycles. With the estimated power consumption of 16’000W per day, we would end up in 102 full cycles per year and have a theoretical life time of over 49 years. Probably not …
Accessories
As the battery of the generator runs on 12V there will be a 48V/12V charger that will take power from the main batteries and keeps the generator charged.
In addition, I will have a direct 48V connection for additional 48V portable power packs that can be charged from the main battery system.
Scalability
The inverters can be scaled up to 6 parallel systems with a maximum power delivery of 24’000kW. But even better, I could easily change the whole system to a 3-phase system and still scale it up, uilising 3, 6 or nine inverters if needed.
And the batteries could be scaled easily to 8 parallel batteries before hitting the 1’000A rating of the bus bars and the shunt.
And if we went for a bigger bus bar, we could also replace the Lynx Shunt with a Victron 2000A SmartShunt.
Summary
So this is it. Until the cells have not been delivered I will not know if this works or not.
We will find out …
Side note: I am no Victron Shop at all, but like how their products integrate with each other and are still able to play with hardware from other manufacturers.
Two weeks ago our water tanks arrived. But due to heavy winds, it was only possible to collect them last weekend.
The tanks are manufactured by Enduramaxx, but I actually ordered the tanks from JDP in Inverness, as it was cheaper to buy from them.
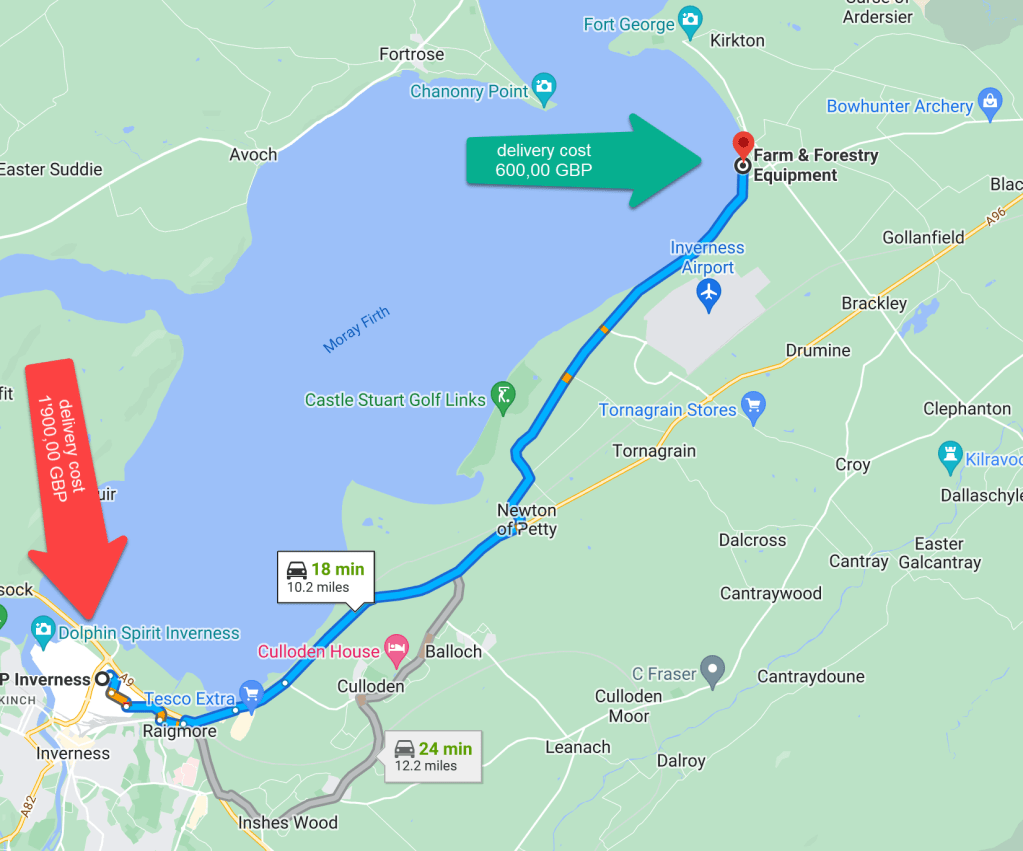
And then there were the transport cost … According to Enduramaxx or JDP, delivery cost to Whaligoe would be have been between 1’800 GBP and 1’900 GBP. Hmm, that is actually more than the price for the tanks!
Though JDP on their web site offered free delivery, there is a fine print on their web site (“Remote Areas”), stating that specific post codes seem to be exempt from it. When I suggested to them to pick up the tanks directly from their branch in Inverness (and thus saving me the delivery cost), they told me that I could certainly do that but the delivery fee would also apply. As it seems their branch in Inverness (post code starting with IV1, in the center of the city) is also considered a “Remote” or “Restricted” area.
But then funnily, Farm & Forestry in Ardersier (being 10 miles away from the JDP Inverness branch) was not considered a restricted area and could get delivered without paying a fantasy price.
A distance of 10 miles makes a difference of 1’300 GBP in delivery cost (source Google Maps)
The next interesting thing was the price of the water tank itself. The price quoted by the JDP main office was cheaper than the price of the Inverness branch – though both would buy the tank from Enduramaxx directly.
Anyway, after some weeks now the both tanks arrived. And I got 2 times the 6’000l version (instead of a 5’600l version that I originally wanted to buy).
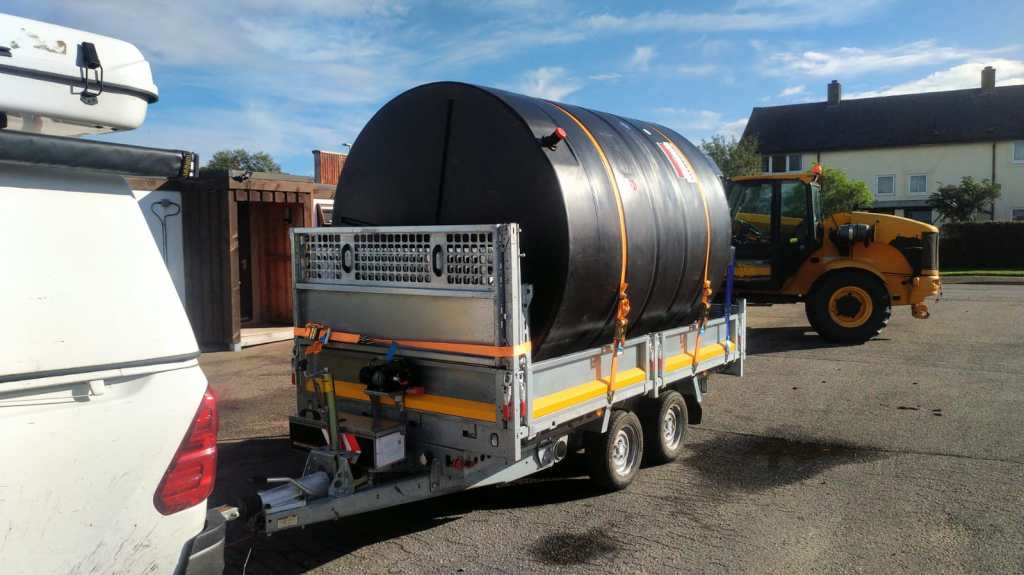
And on Saturday, I went to Inverness to load one of the tanks on my trailer. Once again, the trailer proofed its purpose. After unmounting the high side walls we could drop the tank carefully on the trailer bed.
And as soon as we have the roof on the barn, we can start collecting rain water …
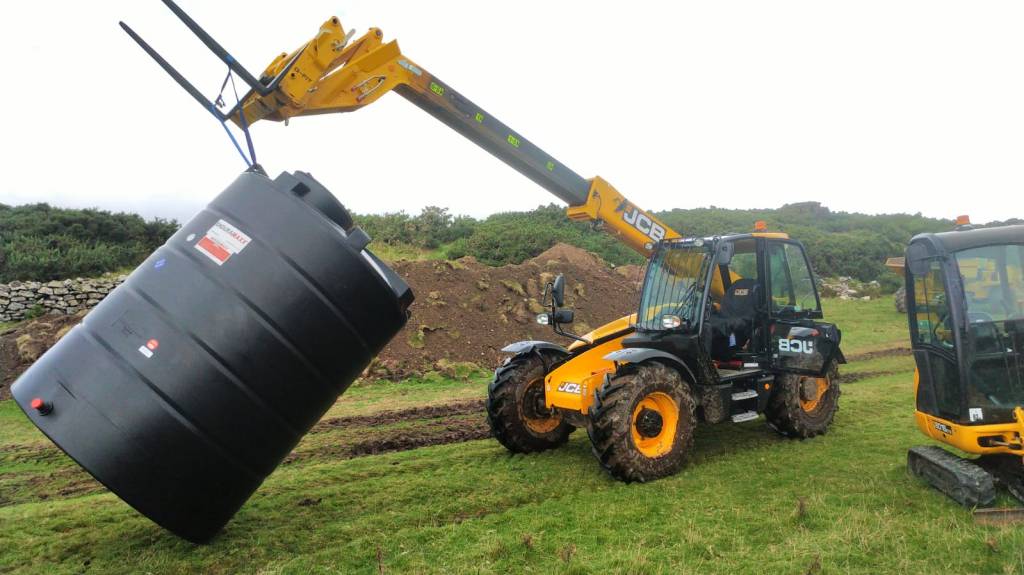
Tank loaded and secured with 2 orange and 2 blue ratchet strapsTank safely arrived in Whaligoe with 3 orange and 2 blue ratchet strapsOn the way to the plotUnloading with the TeleHandler
ps – yes I had to stop on my way home a couple of times as the road surface and the resulting bouncing of the trailer was not helping at all to hold the tank in place …
On Saturday, we picked up our first water tank. Thanks a lot to the guys at Farm & Forestry in Ardersier for helping me! pic.twitter.com/YOaKvmKTpK
After trying to register a postal address for months to no end, I was considering the alternative of applying for a PO box life membership.
And then it was all too easy …
The “problem” was a mixture of not having an access road to the plot where we would like to receive postal mail and having no building on the plot with which the address could be connected to. And then you can only start building with a planning permission. But then how would you get deliveries to the construction site without an address?
Note: yes, this is somehow possible, as in using addresses (which we did) such as: That Gate on the A9 opposite of The Red Farm Caithness AB1 2YZ
When contacting Royal Mail directly via one of their “I would like to register a new postal address” forms, we got the reply, that only the Highland Council could actually register new addresses. Hmmm, so why offering this service in the first place, one might ask?
Highland Council then told us that only with a planning permission and a completed house we could actually register a new address. Bummer.
We are building a house in the future, but we want to start with a barn first, for which we do not need a planning permission.
Rescue came in the form of a “Planning Prior Notification” which is a “notification” (hence the name?) to the Highland Council that we want to build a barn for which we do not need a planning permission, as it falls under “permissible development”.
Funnily, this “notification” still has to be approved by the Highland Council. So, is it then really still a notification? One does not know.
Anyway, with this notification approved we could then ask for a new postal address at the Highland Council by actually getting a “Unique Property Reference Number” (UPRN) first.
Once we got that we could proceed and have the address being activated in the Royal Mail database (but not in the Highland Council address database, as the building has not yet been completed).
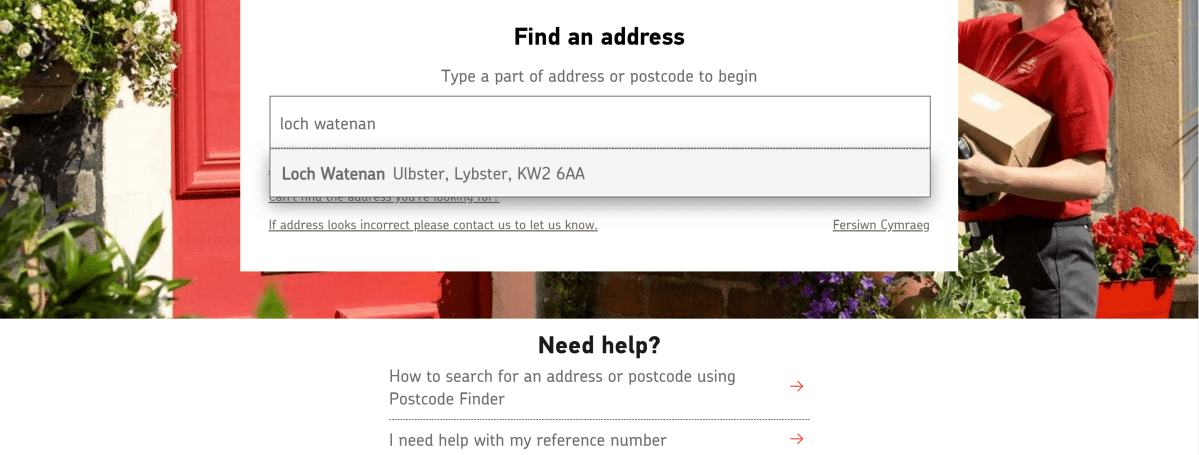
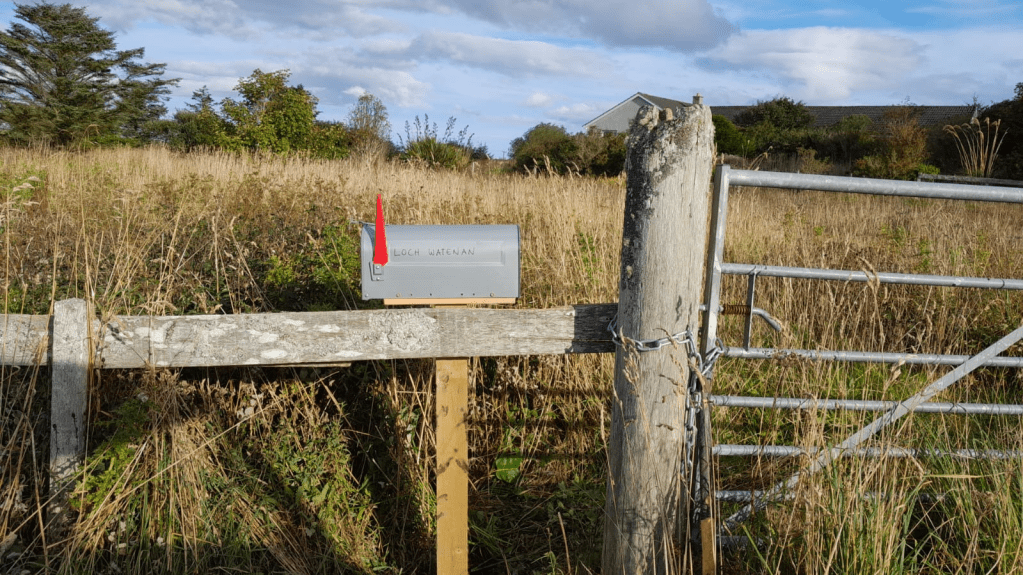
And then it was only a matter of days, that I could do a search for “Loch Watenan” and get the address returned.
Our letter box installed and awaiting mail. End of story.
Ok, it was not that simple.
Some things that had to be done before this happened:
Provide exact details of the location of the property
Provide the planning reference number
Choose house name (much more difficult than one would think)
Provide the OS grid reference number for the property
Convince Highland Council that we still want a postal address and have a secure drop-off point, though our building has no access road
Ask for exception to be included in the Royal Mail address database though the building has not yet been completed
Confirm that delivery to that address is really possible
Inform the local Royal Mail delivery guys that there is actually a new address (probably the most important point here)
Side information here: the road to Loch Watenan actually has a name, though most people here do not know. It is “Watenan Road“.
Originally this was an unnamed road (“U1202” road) while some locals claim, the road was called something like “Marble Road”.
Highland Council U1202 Watenan Road
In reality road name or house name, it does not seem to make a difference. The only thing up here that counts, is: the two local mail delivery guys know you exist. So basically one could write any house name with the correct post code on it, as long it has the correct name (your name) on it.
Today I will task about how we heat water in our Toyota or caravan with a relatively low power consumption.
For this, we use an immersion heater that has a nominal power consumption of 1000W. The water is inside a one liter steel thermos flask. Be careful of course not to fill it up too much to prevent the boiling water of sparkling out of the flask.
Prosper Tauchsieder Real (image from galaxus.ch)
The water here has an initial temperature of 20°C (68F) and takes around 5 to 5 1/2 min to boil.
We successfully used the heater with different inverters. It also worked well on a relatively small model, like the Votronic 1200W and the 12V 200A Liontron battery without any issues.
There are even immersion heater models with lower power consumptions – often with a “portable” denomination. But of course it will then take accordingly longer to boil the water. But it might make sense if you have a smaller battery system or inverter. And there are DC models as well, that can be attached directly to a battery without an inverter at all.
But the main point for us was that this immersion heater just fits perfectly into the flask (after we removed the metal ring you can see on the picture). So after boiling, we can leave the water inside the flask without the need for an additional pot, and without having it to pour from one pot to the flask either.
The heater has a small plastic hook that it holds it in place. So it does not touch the bottom or any side of the flask.
After use the device is certainly hot, but it cools down quite quickly. If you use the water and empty the flask right away and do not have a proper surface on where to cool it, you can stick it back into the flask for cooling off.
And when not in use, the water heater takes nearly no space at all, or at least much less space than a normal electric water heater.
Two years ago, this water heater cost us roughly around 25 CHF. This is (today) around 25 EUR or 22 GBP. We got it from Galaxus, a swiss online shop. But we have no affiliation with it at all.
This model is called “Prosper Tauchsieder Real“, whatever this means. But as I said, there are plenty of different models out there.
Don’t forget to unplug the heater after use as it doesn’t have a sensor to detect when the water is boiling. The description however says, it has a dry detection feature. But I really never tried that out.
Today, we got the planning for our barn. Actually, we received the positive decision for a “prior planning notification” (which is certainly not a Planning Permission), as in Scotland there is no need for full planning permissions when building agricultural sheds.
So, this went really well! And now we can do the next step. That is: ordering the actual building kit which will be delivered from Robinsons Agricultural.
The barn will be a metal construction of 30m x 10m with an eaves height of 5m. We will be starting this week with the foundation and the levelling work.
The building site (to the left hand side of the image)
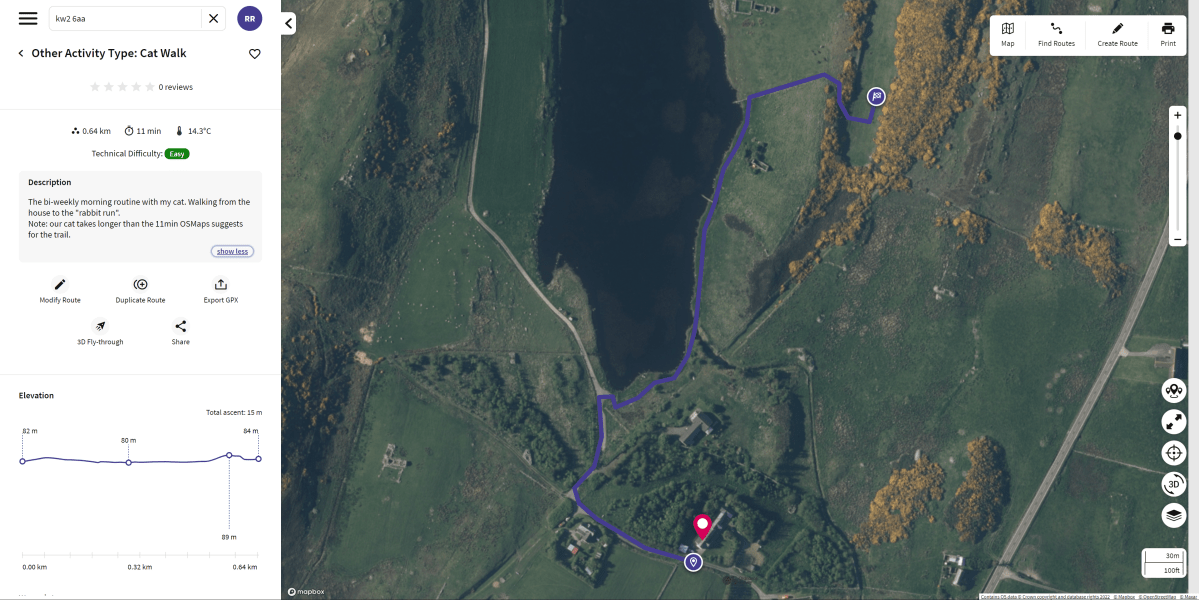
As part of our training excercise for the upcoming hike our cat and I regularily walk from the house to the part of our plot that some locals call the “Rabbit Run”.
Back and forth this is a good 1’250m, after which the cat sometimes needs to take a break.
You can also consider this video as my contribution to the never ending world supply of cat videos on the internet. Hopefully, this remains an exception.