A look into Siglent SDS2000X Plus Software Options

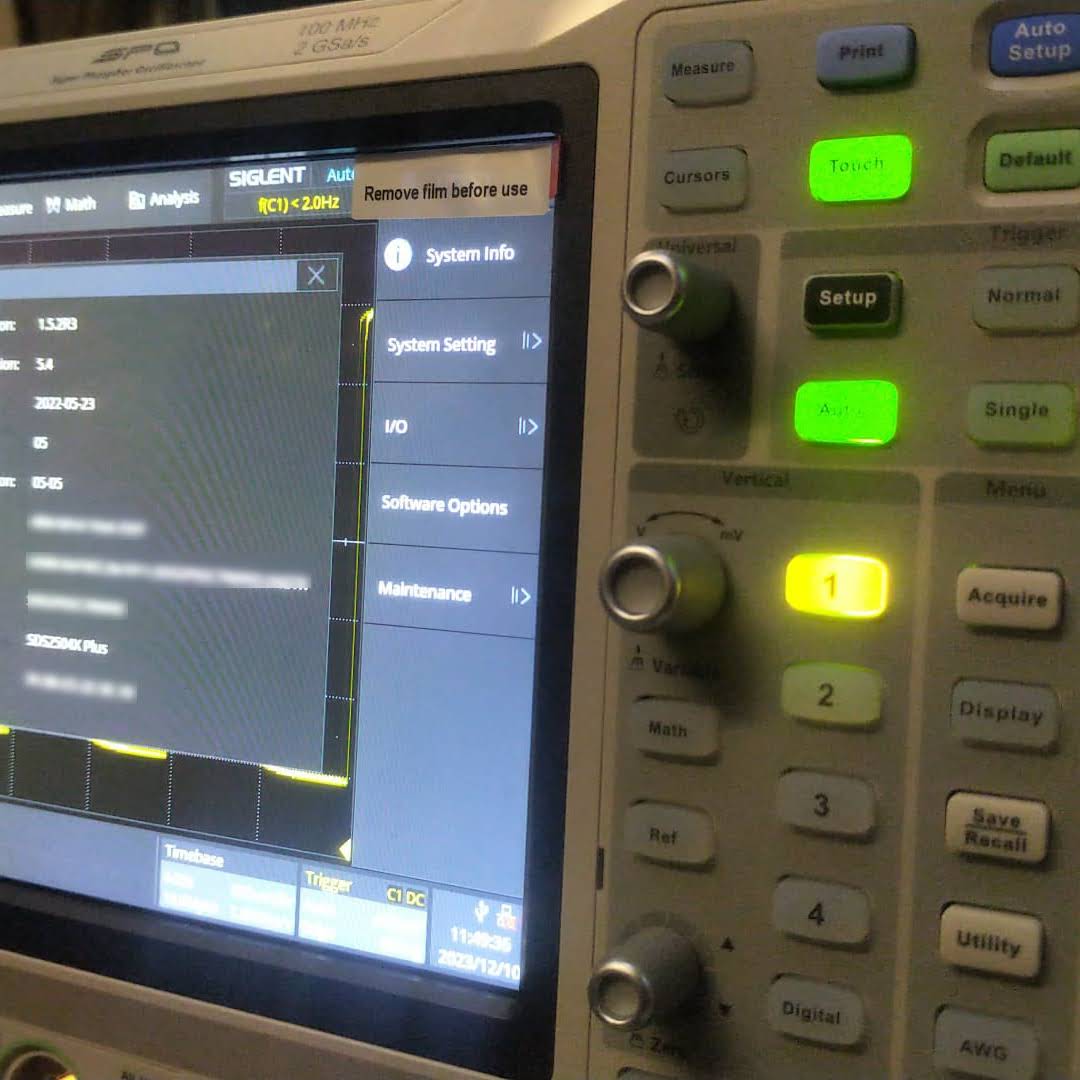
In this article, we have a look into the software options of the Siglent SDS2000X Plus digitial oscilloscope series.

The SDS2000X Plus series has been around for quite some time and – while still on sale – has been superseded by the Siglent SDS2000X HD series. It consists of a 2-channel entry model and three 4-channel models with varying bandwidth (100MHz, 200MHz, 350MHz). Interestingly the hardware in these models is exactly the same (with the one exception of the 2-channel model only having a single acquisition unit). For more details have a look at this video where the device is taken apart:

EEVblog #1309 – Siglent SDS2000X Plus Scope Teardown+Hack

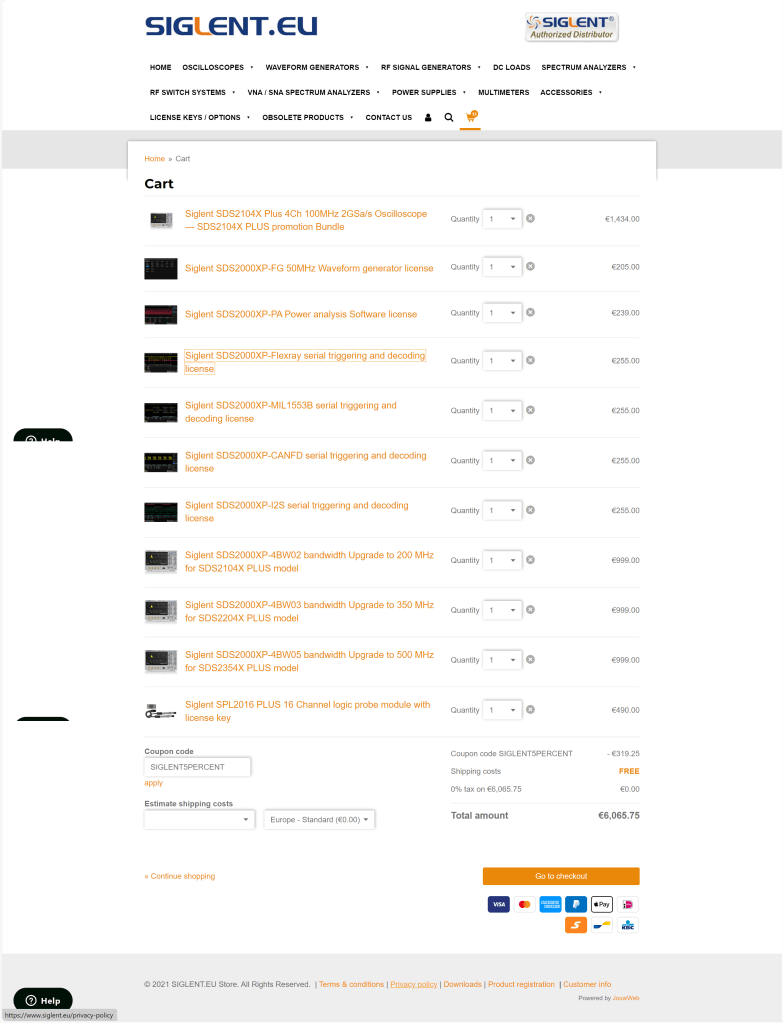
As mentioned in the video, there seems to be the possibilty to upgrade the bandwidth of the oscilloscope to up to 500MHz and additionally unlock a few other options. According to the manufacturer’s web site the value of the software options can add up quite considerably to a multiple of the actual oscilloscope:

Siglent SDS2000X Plus software options

The author of the video, which partially seems to divide its audience by its tonal pitch, remains cryptic about on how to actually do this but only refers to a post on this forum. So the question remains, is this really doable? and if yes, how does it work?

Note1: In case someone is wondering if it is allowed to generate software keys, an option might be to contact the manufacturer to get clarification on this subject.

Note2: I bought my scope with a couple of software options. So, no need for me to generate keys, I would not have otherwise.

A Siglent SDS2104X in action

The questions

According to the forum there seems to exist confusion about the following areas:

  1. What is the SCOPEID?
    The SCOPEID is the 16-digit value you find when you open Utility, System Info and strip of the dash characters from “Scope ID“.
  2. What is the Model?
    According to this video the model just stays as it is. So no replacing of the pre-defined value at all (regardless of the actual model we have).
  3. Which firmware versions work with it? And do I have to downgrade first?
    As it we can read from the Siglent SDS2000X Plus Release Notes, beginning with v1.3.9R10 no downgrade can be done to any version older than that version. In the previously mentioned video we see that exactly that version is used for the demonstration.
  4. Which keys (based on bwopt) work for which option?
    The script generates keys that do not necessarily match 1:1 to the options in the oscilloscope. But a look and search into the user manual reveals that the abbreviations in the script correspond to the product numbers. So for example, MSO is the abbreviation for the 16-channel logic analyser option. However, some keys generated by the script do not seem to have any corresponding sotware option at all (such as MAX or WIFI).
  5. How to generate keys for options originally not included in the script (eg. MANC, SENT)?
    There are options present, especially the MANCH and SENT option, that are not being generted by the script at all. All one would have to do, is to add MANC (mind the missing ‘h‘) and SENT to the array of bwopt and have to re-run the script.
  6. Is there any order in applying the software option keys? Or anything else to consider?
    Everytime a new key is entered, immediate feedback on the screen shows if a key was accepted as valid. A reboot seems to be required to activate the associated function. However, it is not problem at all to insert multiple keys or software options without rebooting.
    A special note about the bandwidth option: as one can see from the web site, it is not possible to buy a 500MHz license upgrade for a SDS2104X. Only the 200MHz option is available. After appliying an upgrade the actual model number of the oscilloscope changes as well and a new bandwidth option appears for that new model. So essentially, an upgrade on a SDS2104X to a 500MHz version (SDS2504X) must be done via these intermediate steps: 200MHz, 350MHz, 500MHz. In the end, only the label printed onto the oscilloscope shows its true origin.
    An upgrade to a more recent version of the firmware afterwards is possible but optional.
    Note1: after upgrading to 500MHz there is no more bandwidth option thus reducing the number of license options by one. I mention this, in case you thought something went missing.
    Note2: the standard probes only work up to 200MHz and also the high-end probe goes only up to 350MHz. So, in order to be really able to use the full 500MHz one probably has to get hold of an active probe.
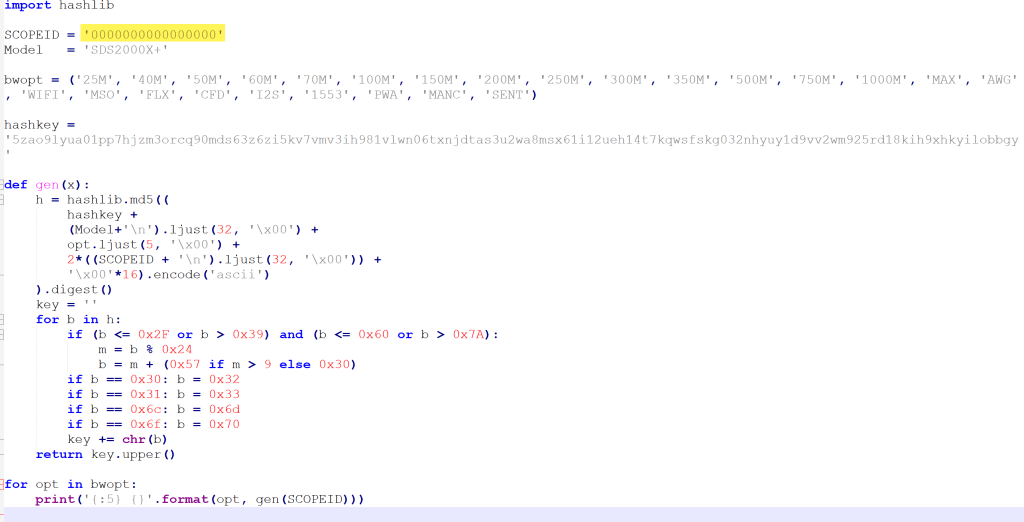
The script

The script itself is pretty basic. The magic MD5 hashkey is being mangled with the Model and the SCOPEID. And then for each bwopt a new key is generated. Interestingly, the gen function never makes use of its parameter x and opt is implicitly referenced from the global scope.

Code from replit.com linked by miyagi

The conclusion

Essentially, this has been a story about weak license keys. Though it might seem perfectly doable to generate keys for software options without reyling on the manufacturer, this is not something that can be generally recommended.

ESP32 with PlatformIO, C++, Unity and ESPIDF

As a follow up to my post about ESP32 with PlatformIO and Arduino, in this post I present how to use PlatformIO with the Espressif IDF (or ESPIDF, for short) in conjunction with C++ and Unity as a UnitTesting framework.

It proved to be much more difficult to get this running than with the Arduino framework.

Here are our requirements for development:

  1. Support (hardware and framework independent) unit tests to be run on the local dev machine (aka env:native).
  2. Support hardware and framework specific unit tests to be run on the actual microcontroller.

Here are some similarities and differences between ESPIDF and Arduino:

  • Again, the native environment will be compiled via SYS2/Mingw64 whereas the microcontroller environments are compiled by the compilers provided by the PlatformIO toolchain.
  • ESPIDF uses app_main() instead of the setup()/loop() construct in Arduino.
  • ESPIDF by default creates a main.c instead of a main.cpp file. We therefore have to use extern "C" { } to unmangle the symbols in our code.
  • For whatever reason the use of #ifdef __cpluscplus always evaluated to false and was therefore not usable. Thus, I used extern "C" unconditionally in the code.
  • To detect the ESPIDF framework, I used the ESP_PLATFORM symbol (instead of the ARDUINO symbol).
  • All framework dependent cpp and h lib files are guarded with #if defined(ESP_PLATFORM).
  • All test code (test_embedded and test_native) has to be surrounded with extern "C" as well (only the code and certinaly not the #includes).
  • Classes and code in lib_dir should not be surrounded with extern "C".
  • Also, I pretty much moved all the code to lib_dir, so the main.cpp is essentially only a stub.
  • We have to manually enable exceptions to support throw etc via build_flags: -fexceptions.
  • (not unit test related) Reading out GPIO to get the state of an LED always returns 0.

The final result can be found here.

Summary

Again, it is quite quirky to setup the development environment. Plus, I could not find a single example out in the wild (PlatformIO in conjunction with C++, Unity with embedded and native testing, ESPIDF).

In the end, I now have a working environment where I can hopefully do what I want to do: sending and receiving CAN messages via the TWAI interface. We will find out …

ESP32 with PlatformIO, C++, Unity and Arduino

After a quick adventure with the .NET nanoFramework on microcontrollers, I sort of came back to my senses and continued with something that seemed to have a brighter future (read: more supported boards, more documentation, bigger community, …). So, after a quick look around, I tried: PlatformIO:

Sounds just too promising. At least promising enough to reactivate my C++03 knowledge and bring it up to at least C++17 (spoiler: after all there _was_ a reason why I switched to C#).

On the way I found out, that we now support auto, bool and lambda expressions but kept the splitting-of-declaration-and-implementation-nightmare – yikes …

Installation

Installation of PlatformIO was really straightforward. After the installation of VSCode, I installed the Python, C/C++ and the C++ extension beforehand. That automatically brought me CMake as well. And after that I just had to add the PlatformIO extension.

From there I could start and create my first project. And depending on the framework chosen (Arduino in my case) the main.cpp comes with either setup() and loop() or just app_main() (EspIdf).

Note: if the main file (under the src folder) is a main.c we have to rename it to main.cpp to use C++ features – I totally forgot about that …

Unit Testing

Building and flashing the controller “just worked”. So, I started to port my C# HelloWorld morse code generator to C++. Certainly, I wanted to write some unit tests along that way. And there the “trouble” started …

There is documentation, but I totally missed the way how unit testing are to be done with PlatformIO (at least when it is one with Unity:

  • First, unit tests are either “local” or “native” tests (on your dev machine) or “embedded” tests. We have to set up a separate *environment* for each.
  • The microcontroller framework (Arduino, in my case) is not supported on the native environment (not even an #include <Arduino.h> is allowed). So, we have to make sure, we use only code that is totally hardware independeent.
  • PlatformIO does not install a toolchain for the native environment (i.e. we have to install a C/C++ compiler ourselves). And on Windows, it is recommended to use MSYS2 with Mingw64. That effectively means, we have different compilers depending on the environment. Something, that just feels weird to me. And something that could cause problems, as I later should find out.
  • Every test is compiled as a separate executable with a main() function. Something I am not used to in a .NET environment. And here is again, it matters which framework (Arduino or EspIdf) we are using, as we have to repeat setup()/loop() or app_main() again and again.
  • The main code in the src folder is compiled as well, which leaves us with duplicate main() function. Preprocessor with #if defined() to the rescue – quite clumsy …
  • And then the main thing: we essentially have to move all the application code to the lib folder, as -by default- the src code is not included when unit testing. That is not only strange to me, but leaves the src folder being an empty stub, as all the code now lives in the the (private) lib folder.
  • Documentation or the Calculator example were only partially helpful. I ended up with the weirdest compilation and linker errors I never dared to imagine.
  • Unity requires we need to specify all tests manually if we want to run them.

But in the end, I got it working. Here is what I did:

Summary

My first impression is … mixed. On the one hand, PlatformIO makes it relatively easy to develop for different hardware/boards. Due to VSCode the “developer experience” is much better than with the Arduino IDE.

But … setting up Unit Testing and how it is implemented is rather awkward. Needless to say, that error messages are not for the faint of the heart.

I cannot say, that I miss my C++ days. On the other hand, not something I could not get used to and around with it.

Hello, world! morse code generator on an ESP32

C# .Net on a Raspberry Pi 400 running Venus OS

Today, I tried to run a C# console application on a Venus OS – and it pretty much worked right away. But why would I want to do that?

The answer is simple: a couple of weeks ago I started to add some “drivers” to Venus OS to support additional features like using a MultiPlus-II as a charger for top balancing cells. With Venus OS, most of the examples I found were written in Python (except for some C++ extensions). And it is no secret that I am not too fond of that. So, why not using my favourite programming language on Venus OS as well?

My first thought was, I would have to install the .Net framework on Venus OS. But, with the advent of self-contained (and thus framework-independent) executables this is not needed.

First, I installed .NET on a Raspberry Pi 400 with Raspbian (just for the fun of it). I basically followed Deploy .NET apps on ARM single-board computers:

curl -sSL https://dot.net/v1/dotnet-install.sh | bash /dev/stdin --channel STS

echo 'export DOTNET_ROOT=$HOME/.dotnet' >> ~/.bashrc
echo 'export PATH=$PATH:$HOME/.dotnet' >> ~/.bashrc
source ~/.bashrc

dotnet --version

… and there it is!

And then it was time for another infamous Hello, world!:

dotnet new console -o HelloWorld
cd HelloWorld

And now for the compilation.

dotnet publish --sc -r linux-arm -c Release -p:PublishTrimmed=true

linux-arm was needed, as Venus OS is a 32-bit operating system (regardless of the 64bit architecture of the Pi 400). I chose PublishTrimmed to save some space. And of cource, --sc for self-contained.

I then gzipped the publish folder and copied it to the Venus OS (via WinSCP). After uncompressing the files (with permissions left intact), I ran the program and got this error:

Process terminated. Couldn't find a valid ICU package installed on the system. Please install libicu (or icu-libs) using your package manager and try again. Alternatively you can set the configuration flag System.Globalization.Invariant to true if you want to run with no globalization support. Please see https://aka.ms/dotnet-missing-libicu for more information.

Enabling invariant mode seemed to be the easier choice. After all, my future drivers would hopefully not need globalisation support anyway. So, I recompiled after adjusting the .csproj file:

<PropertyGroup>
    <InvariantGlobalization>true</InvariantGlobalization>
</PropertyGroup>

… and it worked:

root@raspberrypi4:~# publish/HelloWorld
Hello, World!

I executed this on a Raspberry Pi 400 running Venus OS v3.00 and .Net 7.

From there, I wanted to connect to D-Bus which proved to be more difficult. Following the Connecting .NET Core to D-Bus I had to find out that Tmds.DBus.Tool was not compatible with .Net 7. I will have to look into that separately.

Note about IL trimming: the size difference is really noticable. In my example the untrimmed compilation was around 65MB and the trimmed version around 13MB. However, it seemed to me that the trimmed version took slightly longer to load and execute. So, I am not sure if I will keep this switch on.

So, what would be the perceived advantages of using .Net on Venus OS for me?

  1. Known developing environment
  2. Better type safety
  3. Reusability of a lot of basic code
  4. Easier testing and mocking

But this is only my personal opinion and preference. Yours might differ.

Using Victron MultiPlus-II for top balancing LiFePO4 cells

Top balancing is a topic where a lot of people have written about – and now it is my turn …

It is common understanding to use a regular charger when top balancing, and one the one hand set the Charge Voltage Limit (CVL) to cellCount * 3.65V and use a reasonable current and wait for an extended period of time until all cells have reached their cell voltage maximum. And reasonable means to use a current where the BMS balancer keep up with and distribute the Amps across the cells without going into a Overvoltage (OVP) for a single cell.

So, instead of using a charger with a high supported current of at least 20A we now can use our regular Victron MultiPlus-II inverter/charger – with the help of Venus OS.

The reason why we cannot use a Victron MultiPlus-II out of the box as a charger is the fact, that is does not support fixed Amp configurations (only maximums). And after a while at a specific voltage the MultiPlus-II would enter Absorption phase and thereby reducing the current over time and stopp charging after a while altogether.

So with the help of a custom service (or Python script based on the dummyservice) we can create a battery monitor and set a fixed current.

I am not going into details on how to get a Venus OS device (Victron Cerbo GX or Raspberry Pi) up and running. There is plenty of information on the internet. Or have a look at this article where I briefly describe the setup of a Pi for our BYD battery system.

The *service* itself can be run from a shell: /data/VirtualBatteryMonitor/VirtualBatteryMonitor.py (I copied the script into /data to survive a firmware update).

And then the service should appear in the “Device List”:

Our service as a device to support a constant charge current

There are two more configuration entries needed:

  1. Enable our service as “Battery Monitor” (Settings, System setup, Battery Monitor)
  2. Enable DVCC (Settings, DVCC)
Our service configured as a “Battery Monitor”
Enable DVCC

The actual parameters (charge current and maximum voltage) can be configured via dbus-spy from a shell:

Service parameters as shown by dbus-spy

The actually configured values are then shown under “Parameters” of the service (Service, Parameters):

Current configuration set to 5A constant charge current

Note1: There is no need for an actual integration of the BMS with the Venus OS.

Note2: Use at your own risk. Misconfiguring could potentionally harm the BMS, the battery or both.

Note3: Do not leave the script running / the battery charging unattendedly.

#!/usr/bin/env python3

"""
A class to put a simple service on the dbus, according to victron standards, with constantly updating
paths. See example usage below. It is used to generate dummy data for other processes that rely on the
dbus. See files in dbus_vebus_to_pvinverter/test and dbus_vrm/test for other usage examples.

To change a value while testing, without stopping your dummy script and changing its initial value, write
to the dummy data via the dbus. See example.

https://github.com/victronenergy/dbus_vebus_to_pvinverter/tree/master/test
"""
from gi.repository import GLib
import platform
import argparse
import logging
import sys
import os
import dbus
import os

# our own packages
sys.path.insert(1, os.path.join(os.path.dirname(__file__), "../ext/velib_python"))
sys.path.insert(1, "/opt/victronenergy/dbus-systemcalc-py/ext/velib_python")
from vedbus import VeDbusService
from vedbus import VeDbusItemImport

class VirtualBatteryMonitor(object):
    def __init__(
        self,
        servicename,
        deviceinstance,
        paths,
        productname="MultiPlus Charger",
        connection="dbus",
    ):

        try:
            # Connect to the sessionbus. Note that on ccgx we use systembus instead.
            logging.debug("Opening SystemBus ...")
            dbusConn = dbus.SystemBus()
            logging.info("Opening SystemBus SUCCEEDED.")
        except:
            logging.error("Reading system SOC FAILED.")

        logging.debug("Opening dbus '%s' ...", servicename)
        self._dbusservice = VeDbusService(servicename)
        logging.info("Opening dbus '%s' SUCCEEDED.", servicename)
        self._paths = paths

        logging.debug("%s /DeviceInstance = %d" % (servicename, deviceinstance))

        # Create the management objects, as specified in the ccgx dbus-api document
        self._dbusservice.add_path("/Mgmt/ProcessName", __file__)
        self._dbusservice.add_path("/Mgmt/ProcessVersion", "Unkown version, and running on Python " + platform.python_version())
        self._dbusservice.add_path("/Mgmt/Connection", connection)

        # Create the mandatory objects
        self._dbusservice.add_path("/DeviceInstance", deviceinstance)
        self._dbusservice.add_path("/ProductId", 0)
        self._dbusservice.add_path("/ProductName", productname)
        self._dbusservice.add_path("/FirmwareVersion", 0)
        self._dbusservice.add_path("/HardwareVersion", 0)
        self._dbusservice.add_path("/Connected", 1)

        # Create all the objects that we want to export to the dbus
        self._dbusservice.add_path('/Dc/0/Voltage', 3.4 * 16, writeable=True)
        self._dbusservice.add_path('/Dc/0/Current', 5, writeable=True)
        self._dbusservice.add_path('/Dc/0/Power', 3.4 * 16 * 2, writeable=True)
        self._dbusservice.add_path('/Dc/0/Temperature', 15, writeable=True)
        self._dbusservice.add_path('/Dc/0/MidVoltage', None)
        self._dbusservice.add_path('/Dc/0/MidVoltageDeviation', None)
        self._dbusservice.add_path('/ConsumedAmphours', 123, writeable=True)
        self._dbusservice.add_path('/Soc', 75, writeable=True)
        self._dbusservice.add_path('/TimeToGo', None)
        self._dbusservice.add_path('/Info/MaxChargeCurrent', 5, writeable=True)
        self._dbusservice.add_path('/Info/MaxDischargeCurrent', 0, writeable=True)
        self._dbusservice.add_path('/Info/MaxChargeVoltage', 3.65 * 16, writeable=True)

        self._dbusservice.add_path('/Info/BatteryLowVoltage', 2.75 * 16, writeable=True)
        self._dbusservice.add_path('/Info/ChargeRequest', False, writeable=True)
        self._dbusservice.add_path('/Alarms/LowVoltage', 0, writeable=True)
        self._dbusservice.add_path('/Alarms/HighVoltage', 0, writeable=True)
        self._dbusservice.add_path('/Alarms/LowSoc', 0, writeable=True)
        self._dbusservice.add_path('/Alarms/HighCurrent', 0, writeable=True)
        self._dbusservice.add_path('/Alarms/LowCellVoltage', 0, writeable=True)
        self._dbusservice.add_path('/Alarms/LowTemperature', 0, writeable=True)
        self._dbusservice.add_path('/Alarms/HighTemperature', 0, writeable=True)

        self._dbusservice.add_path('/Capacity', 156, writeable=True)
        self._dbusservice.add_path('/CustomName', "Virtual Battery Monitor (%/V/W)", writeable=True)
        self._dbusservice.add_path('/InstalledCapacity', 280, writeable=True)

        self._dbusservice.add_path('/System/MaxCellTemperature', 15, writeable=True)
        self._dbusservice.add_path('/System/MaxCellVoltage', 3.4, writeable=True)
        self._dbusservice.add_path('/System/MaxTemperatureCellId', "C5", writeable=True)
        self._dbusservice.add_path('/System/MaxVoltageCellId', "C2", writeable=True)
        self._dbusservice.add_path('/System/MinCellTemperature', 15, writeable=True)
        self._dbusservice.add_path('/System/MinCellVoltage', 3.4, writeable=True)
        self._dbusservice.add_path('/System/MinTemperatureCellId', "C6", writeable=True)
        self._dbusservice.add_path('/System/MinVoltageCellId', "C3", writeable=True)
        self._dbusservice.add_path('/System/NrOfCellsPerBattery', 16, writeable=True)
        self._dbusservice.add_path('/System/NrOfModulesBlockingCharge', 0, writeable=True)
        self._dbusservice.add_path('/System/NrOfModulesBlockingDischarge', 0, writeable=True)
        self._dbusservice.add_path('/System/NrOfModulesOffline', 0, writeable=True)
        self._dbusservice.add_path('/System/NrOfModulesOnline', 1, writeable=True)
        self._dbusservice.add_path('/System/Temperature1', 15, writeable=True)
        self._dbusservice.add_path('/System/Temperature2', 15, writeable=True)
        self._dbusservice.add_path('/System/Temperature3', 0)
        self._dbusservice.add_path('/System/Temperature4', 0)

# === All code below is to simply run it from the commandline for debugging purposes ===

# It will created a dbus service called com.victronenergy.pvinverter.output.
# To try this on commandline, start this program in one terminal, and try these commands
# from another terminal:
# dbus com.victronenergy.pvinverter.output
# dbus com.victronenergy.pvinverter.output /Ac/Energy/Forward GetValue
# dbus com.victronenergy.pvinverter.output /Ac/Energy/Forward SetValue %20
#
# Above examples use this dbus client: http://code.google.com/p/dbus-tools/wiki/DBusCli
# See their manual to explain the % in %20


def main():
    logging.basicConfig(level=logging.DEBUG)

    from dbus.mainloop.glib import DBusGMainLoop

    # Have a mainloop, so we can send/receive asynchronous calls to and from dbus
    DBusGMainLoop(set_as_default=True)

    pvac_output = VirtualBatteryMonitor(
        servicename="com.victronenergy.battery.VirtualBatteryMonitor.ttyO1",
        deviceinstance=0,
        paths={
            "/Ac/Energy/Forward": {"initial": 0, "update": 1},
            "/Position": {"initial": 0, "update": 0},
            "/Nonupdatingvalue/UseForTestingWritesForExample": {"initial": None},
            "/DbusInvalid": {"initial": None},
        },
    )

    logging.info(
        "Connected to dbus, and switching over to GLib.MainLoop() (= event based)"
    )
    mainloop = GLib.MainLoop()
    mainloop.run()


if __name__ == "__main__":
    main()

The script is available here.

For my use case, this really helps as now I have a powerful charging (3 * Victron MultiPlus-II 48/5000/70-32 in parallel) that can charge the battery initally with 140A+ and later with smaller and smaller currents until all cells have reached their maximum voltage.

Maybe you find this useful, too.