The Caravan we got last year did not come with an inverter, so getting coffee in the morning or running a microwave was only possible when our main generator was running. And the installed battery for 12V support had a rather small capacity. This was clear to us from the beginning, as we eventually wanted to connect the Caravan to our EVE 280Ah cells.
But since we got our Starlink internet and our router did not seem to run easily on DC power, we needed -in addition to the temporary morning AC coffee spike – a more permanent AC solution.
Of course, first I updated the firmware of the inverter and configured it work with the battery:
Setting the AC input to 16A
Setting the battery type to LiFePO4
Setting the charge current to 70A (which is over the recommend amount of 50A, but see below for details)
As I did not want to connect a Cerbo GX to the system, I just used the VictronConnect App. Maybe I add a VE.Bus Smart dongle later on, or I connect some GX nevertheless. Who knows … Until now, it needs a wired connection to the inverter to see its status.
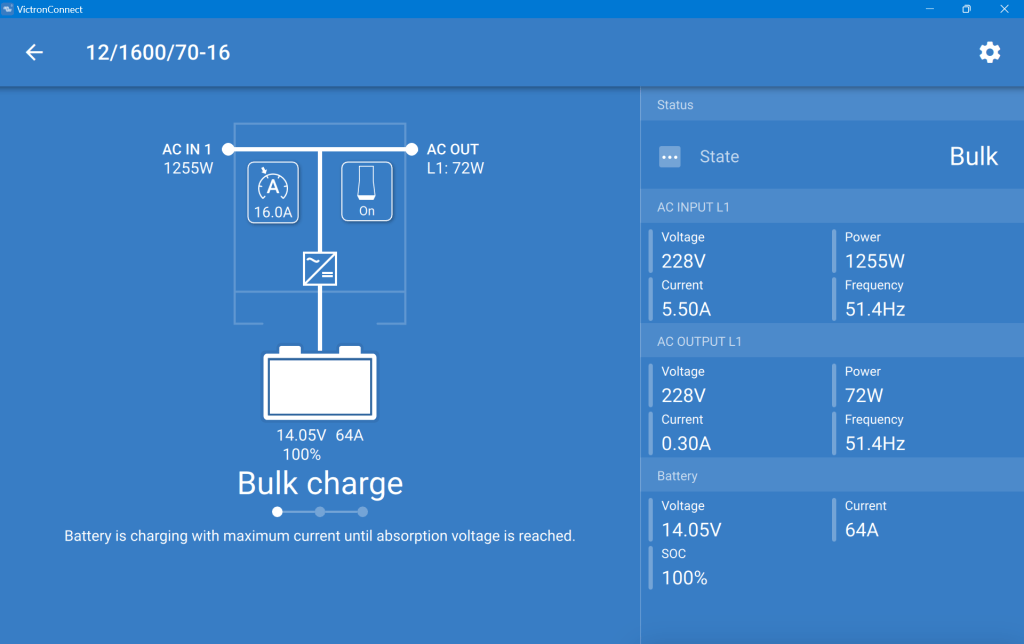
After powering on the generator, I confirmed everything was roughly working as expected. During the first run, the SOC was shown as 100% though the BMS of the battery internal saw it differently. In addition, the reported Amps and temperature were seen differently, as well. So, even that I set the inverter over the recommended maximum of 50A for the battery, the actual charge power was never much higher than the actual maximum).
This is what the inverter saw (100% SOC, 14.05V DC cell voltage, charging at 64A):
MultiPlus charging the Liontron battery via the generator
And this is, what the Liontron BMS reported (76% SOC, 13.8V DC cell voltage, charging at 55.5A):
The SOC as seen by the Liontron battery BMS
In the end, the BMS stopped charging when it thought its batteries were full. And the inverter did not complain. However, I noticed that the cells were really not in balance (with a delta of 200mV between the lowest and highest voltage).
Discharging was ok, as well. However, I soon realised that the 100A discharge current could not be achived in my setup. The inverter tried to draw power and the BMS cut off with a “Discharge over-current” (OCD). SO, still no coffee via our Nespresso machine (and no microwave either, for that matter).
So, what is the take away of all this?
It works and now, I can run the Internet all day.
All in all, it is a relatively simple and quick setup.
The Liontron battery does somehow not live up to its specs (and yes, I know the battery could be a size bigger for what I want to achieve; but I did not want to buy an additional battery for this temporary solution).
It is way cheaper and more flexible than to buy this “off the shelf”.
Maybe, I add a Victron SmartShunt to get a more accurate SOC reporting (as I do not see any other way to integrate the BMS with the inverter).
Charging of the battery is quite fast when running the generator.
So, a few already know … In the last couple of days, I finally decided for a “universal” adapter standard to get rid of my UK, Swiss and European plugs and sockets. I looked at different adapters and the winner is:
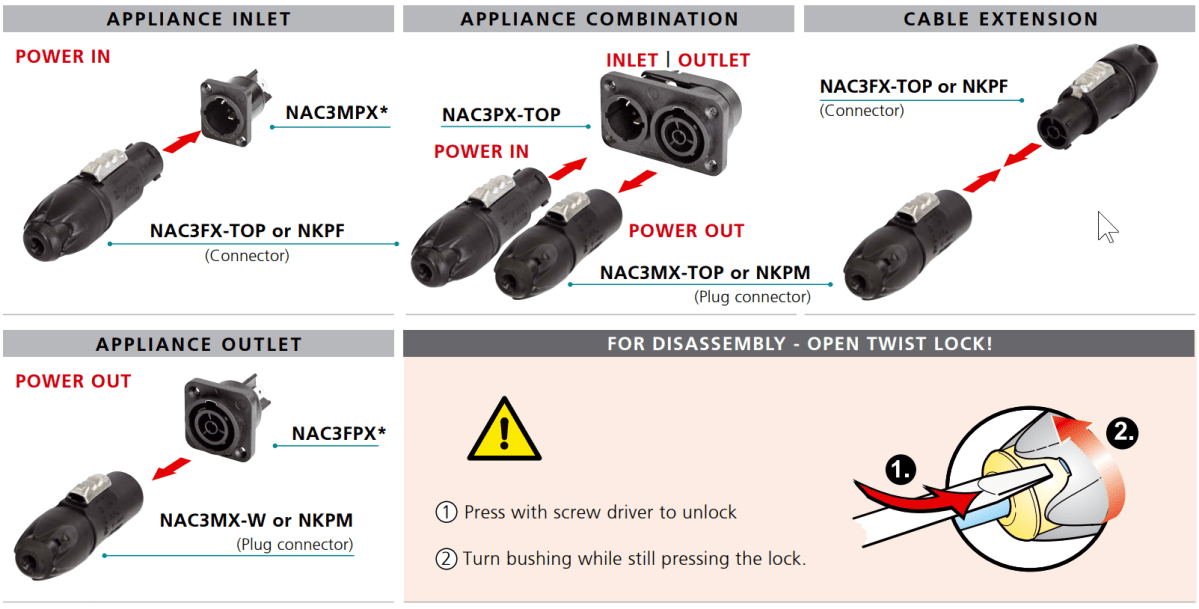
The connector is a successor to the tried and tested “PowerCon” – but with some advantages:
It supports “hot-plugging” (connecting and disconnecting under load)
It is IP65 rated.
They come in a “L”-version for cables with a larger diameter. But even the normal sized connectors still fit a 3-core 2.5mm2 H07RN-F cable.
It is also a locking connector like the original PowerCon with male and female connectors and good for up to 16A. But they are a little more expensive. Interestingly, Thomann was the cheapest supplier I could find in Switzerland. Below you find a simple overview with the existing connectors and sockets along with their part numbers (taken from the Neutrik web site).
As you can see, there is no colour-coding for power inlets and outlets any more. Water-proof caps for the (wall) sockets are around 1.50 CHF per cap and therefore relatively expensive.
But what problem was I trying to solve in the first place?
We have AC electricity in our cars, the caravan and the trailers and soon in the barn and shed at the Loch. And we have appliances with UK, Swiss and EU (Schuko, Euro) plugs as well. And a plethora of adapters with the right one always not at hand. It was time to change that.
And the one thing I knew for sure was: I did not want to install UK sockets in the barn and shed. So, my idea was to install some more space-saving sockets. I already had good experience with the original PowerCon connector. However, they are not meant to be switched under load. Something that I definitely wanted to have with my new solution.
I could have sticked to plain Swiss connectors, as most of my appliances are already equipped with it. However, the typical Swiss triple T13 adapters tend to be occupied quite quickly as soon as we use AC/DC adapters or the Schuko fix-adapters. And if you get a quality product from a company like Feller, each triple socket costs around 50,00 CHF to 60,00 CHF. Compared to 3 Neutrik sockets this is way more expensive.
So, instead of researching any further, I quickly made a decision and went for the TRUE1 TOP system (from Liechtenstein). And it seems that I am not the only one with that idea, as I could see from various videos here, here, here and here.
My only real concern is, that after the “true” TRUE1 and the recent successor TRUE1 TOP, there will soon be an even “truer” replacement in the form of another imcompatible connector. But hey, what would one know anyway these days?
So, after last week the first batch of sockets and connectors arrived, this weekend I started with the conversion.
Inside our caravan, I added a couple of Neutrik sockets in the living room. See here:
Neutrik PowerCon True1 Top in our UK Swift Sprite Major 4 EB
I then updated the connections on the Toyota Hilux and relaced all the inputs, outputs and appliances. With this I could get rid of quite some adapters (from and to EU, UK, CH, CEE16-1, CEE16-3 etc).
Cooking with Neutrik PowerCon True1 Top in our Toyota Hilux
So what do I think so far? I am positively surprised.
Exchanging the connectors is simple and quick.
Even the thick 3-core 2.5mm2 H07RN-F cables fit in the connectors.
All the screws in the connectors are Torx (TX).
The connectors are not too bulky.
The adapters I made (e.g. from UK to Neutrik) are all rated for 16A (or 13A if we reuse the existing UK plugs). Travel adapters like the ones from Skross are typically only rated to 7A or 8A.
So, I will keep changing more and more of my appliances and will resurrect this post when I have news on this …
While we were building our washroom on the plot, we were thinking of having a hot water shower in there as well. But instead of having a boiler and keeping the water hot for an extended unused time, we were thinking of sth different:
1* immersion heater with a power rating to your liking, such as “Rommelsbacher TS2003” (with 2000W with AC). You can also go for a DC model that can be run directly from a (12VC) battery or DC source. Just make sure, that the heater is not longer than the height of the canister.
1* thermometer, such as “TFA Butter Quark Cheese Thermometer“ I opted to an analogue one going up to 100°C and made from glas instead of plastic.
1* short USB-C to USB-C cable for transmitting at least 36W
30cm of 1.5mm2 some cable
1* plastic bag or similar to fit the power bank and the trigger board
some plastic tape to “seal” the plastic bag
an energy source
How it works
Fill the canister with water (20l max).
Place the thermometer into the canister.
Place the heater into the canister and hook it to the opening of the canister. Make sure the metal of the heater does not touch the plastic or the thermometer.
Power on the heater (either from your battery or your inverter) and wait until the water gets to the destination temperature. For the actual duration see “The maths” section below.
Remove the heater.
Insert the immersion pump of the shower into the canister.
Connect the power bank to the USB-C trigger board via the USB-C cable.
Have the trigger board output voltage to be set to 12V permanently or set it manually to 12V.
Connect the power calbes of the shower to the trigger board.
Have a shower.
The maths
In case you are wondering, how it would take to heat up the water, here is my calculation (with the formula taken from various sources on the internet).
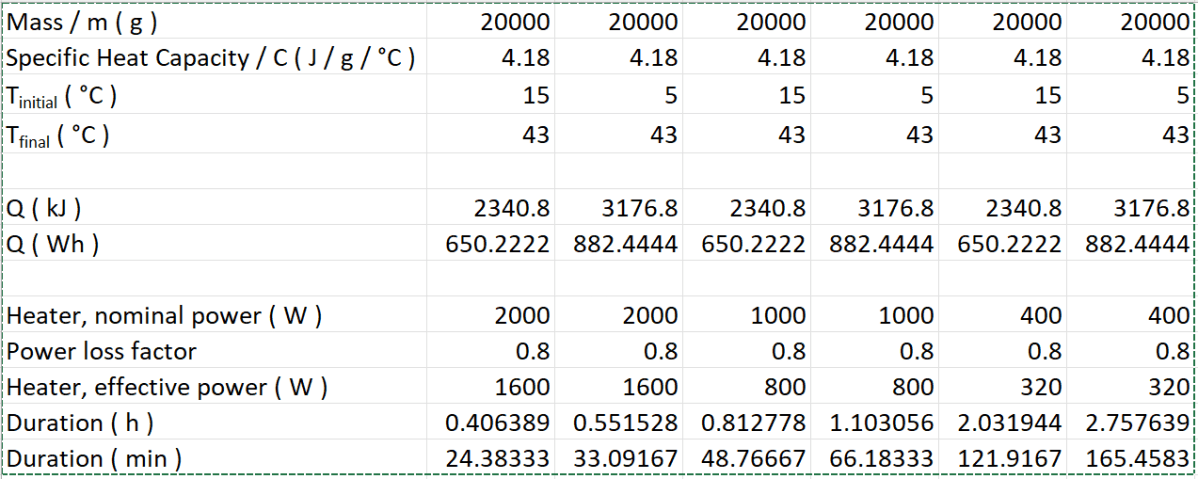
Q = m * C * delta(T)
So in case we want to heat 20l to 43°C from an initial temperature of 15°C with a 2000W immersion heater, we might need to wait for approx. 25min. If we did same but with an initial water temperature, it took us roughly 33min.
With a 1000W immersion heater, the numbers would change to 49min and 66min. And with a 400W we would have to wait 122min or 166min.
The amount of power needed is also shown on the above table. As you can see, it uses between 650Wh and 885Wh. So be careful when using a 12V immersion heater with your 90Ah car battery – don’t …
Conclusion
It quickly becomes obvious that a heater with only 400W will take too long to heat the water. At least I would put it over night into the motorhome, caravan, trailer or wahtever place so it can “pre-warm” a little bit. This might save you between 45min – 60min.
With 20l of water the shower experience will be limited to under 6min on “full throttle”. But with careful “breaks”, I still think the amount of water is sufficient for a full shower (not including washing long hair, of course). And if this does not provide sufficient water, there is always the option to add another 20l.
And: we will post a video with visual evidence as soon as it gets warmer …
Living in the north of the northern Highland comes with its own kind of specific “challenges” (as one would euphemistally phrase in today’s project world).
One of it would be that most delivery is only to “Mainland UK” which is sort of extends only to south of Inverness (which is only somehow understandable when one looks far back at the “Caledonian orogeny“). Anyway.
But even worse: Along with that delivery restriction comes the fact that there are also only very little shops with proper (or professional) selection of material up here. And this is also quite logical in itself. What could be sold in a shop, if nothing can be delivered to it?
This seems to have led to a “What we don’t have, you don’t need” attitude (no offence) and a supply:demand ratio that equates to higher sales prices.
So why am I writing this? I was looking for high current DC connectors for the battery systems I am making, I was looking to buy the Anderson Power Product SB 175 Connector. But the trusted (or only) electrician shop up here (CEF, a nationwide chain of 390 shops across UK) does not stock them, so I would have to resort to Mouser Electronics or Digi-Key Electronics for online ordering. There prices are about the same around 20 GBP per connector, which is not spent easily and about twice as much as other resellers or distributors charge (according to the Anderson web site).
In Switzerland I saw Distrelec selling compatible connectors under its house brand “RND Connect” for a converted price of 15 GBP (depending on the current exchange rate). This is not much of a saving taking into consideration that these are only rated for 175A instead of 280A.
And then there are numerous sellers on Aliexpress where we do not know beforehand what we actually get – but at a much lower price point.
So I went shopping to see the quality of the different manufacturers. My criteria for ordering were availability, low shipping cost and good reviews.
A selection of Anderson SB175 clones
I also ordered a shop with pre-manufactured cables and one with handles (where the price difference is even bigger).
I post an update when the items arrived and I had time to test them. So then we will see if these connectors can compete and are really compatible.
The foundation works for our barn are progressing, so hopefully the barn will be finished by the end of the year and we can start setting up a workshop – and our main electricity installation.
Last year, when I did a rough planning of our electricity needs and installation I decided to go for a battery system from Pylontech or BYD. But now, it is very hard to find a reseller or dealer that can actually deliver these batteries in the UK.
So our current plan is to “build” the batteries ourselves. And thanks to Stuart Pittaway (support him on Patreon, he created the DIYBMS) I found Fogstar, a company that imports and sells Eve battery cells. And this is where I ordered my 112 Eve 3.2V 280Ah 0.5C cells – to be delivered in late November (hopefully).
In the following sections I will explain why I ordered these cells and how I will connect them. So let’s start …
The generator
Our system will be completely off from the main electricity grid. We only have a JCB G20QS as a backup generator that can produce a constant power of 20kVA or 14.4kW. Running this generator at around 75% capacity is the most energy efficient way and will consume roughly 3.29 l per hour. This means I will have an output of 10.86kW and get a 3.3kW per litre of diesel.
Consumption calculation for JCB G20QS
The load
Despite my previous thoughts I will run the whole system on a single phase. This is due to the nature of “electric showers” in the UK all being single phase and using power between 8kW and 10.5kW. As I will use eneergy from the batteries for heating as well, I plan for a daily power consumption of 16kWh per day with a peak consumption of 12kW.
The batteries
I want to be able to run at least 3 days completely on batteries, resulting in a storage capacity of 48kWh to 64kWh.
Currently available LiFePO4 cells range between 280Ah and 320Ah and have normally a C rating of 0.5C. So if use 4 parallel batteries with 16 280Ah cells each I will end up with a capacity of 4* 16 * 3.2V * 280Ah = 4 * 14’336 VAh = 57’344 VAh.
The maximum current draw would be 4* 140A = 560A with a resulting available power between 28’672VAh and 22’400VAh (when the cells run at 2.5V just before shutting off). As it is hard to find DC breakers for that current rating, I actually restrict the maximum draw to 125A per battery giving me a draw of maximum 500A and a resulting available power range between 25’600VAh and 20’000VAh. This will give me at least 16’000Wh.
Side note: I was not sure, if I should really go for LiFePO4 batteries, as I do have the space and storing weight is not a problem either. But in the end I opted against lead acid batteries as the LiFePO4 has become so much cheaper. Temperature is not a problem for me in Scotland as it does not really get cold and the batteries are not outside below 5°C.
And the main reason why I went for the 280Ah cells (instead of bigger ones) is, that
( a ) I do not need the bigger capacity of 4 batteries with larger Ah, and
( b ) I see the remaining power of the system, when one battery is offline, as too little with a 3 battery system (instead of a 4 battery system), and
( c ) I would need bigger circuit breakers (with the 304Ah cells), and
( d ) I can still draw 15’000VA with only 3 batteries on the 280Ah setup.
Comparison between 280Ah, 304Ah and 320Ah cells
So the whole system is wired as a 4p16s system (instead of a 16s4p). Or was it the other way round? I always mix it up …
The inverters
I will use 3 parallel connected Victron MultiPlus II 48/5000/70-50 inverters that can deliver a constant power of 15’000VA or 12’000W (and peak up to a total of 27’000W).
One good thing about the model 5000 inverters is that they are relatively energy efficient (rated at 96%) and use only 18W per inverter. So during normal operation I might be running only 2 inverters at a time (with 36W), but I can easily add the 3rd inverter (with a total 48W). And given the output the batteries I could also add a 4th inverter later, if I really needed more peak power without having to add another 16s battery.
The connections
For this system I will use the Victron Lynx DC distribution system that is rated for 1’000A. The main fuse in the Lynx Shunt VE.Can (which is also rated for 1’000A) will run with a 500A fuse. The shunt itself is necessary as the Victron Cerbo GX controller cannot handle more than a single BMS. The shunt will tell the GX via the CAN bus the load level of the 4 batteries and thus hiding the individual batteries from the GX.
Charging will be done via the 3 MultiPlus inverters where each inverter can handle a 70A. This is slightly under the 212A that the generator can produce at 75% load (see above).
This means we would theoretically run the generator for 320min to charge all 4 batteries completely (needing roughly 17l of diesel).
If we only used the generator to charge the batteries for the whole year, we would end up with around 540h of running the generator, costing us 2’040GBP (at a current price of 1.15GBP per litre).
Side note: Though the generator is able to run constantly 24/7, the service package covers an 800 h per year. So even with these 540h we are well below this threshold.
Discharging
As already written, I restrict the discharge per battery to 125A, but the realistic discharge current should be between 75A and 98A per battery on full load (so I could actually also use a 100A DC circuit breaker). These number take into consideration the loss of the inverter, reactive power and the minimum cell voltage before shutdown.
With these parameters we could draw 12kW for a period of roughly 3.6h.
The Eve cells claim to have a lifetime of 5’000 cycles. With the estimated power consumption of 16’000W per day, we would end up in 102 full cycles per year and have a theoretical life time of over 49 years. Probably not …
Accessories
As the battery of the generator runs on 12V there will be a 48V/12V charger that will take power from the main batteries and keeps the generator charged.
In addition, I will have a direct 48V connection for additional 48V portable power packs that can be charged from the main battery system.
Scalability
The inverters can be scaled up to 6 parallel systems with a maximum power delivery of 24’000kW. But even better, I could easily change the whole system to a 3-phase system and still scale it up, uilising 3, 6 or nine inverters if needed.
And the batteries could be scaled easily to 8 parallel batteries before hitting the 1’000A rating of the bus bars and the shunt.
And if we went for a bigger bus bar, we could also replace the Lynx Shunt with a Victron 2000A SmartShunt.
Summary
So this is it. Until the cells have not been delivered I will not know if this works or not.
We will find out …
Side note: I am no Victron Shop at all, but like how their products integrate with each other and are still able to play with hardware from other manufacturers.
Today I will task about how we heat water in our Toyota or caravan with a relatively low power consumption.
For this, we use an immersion heater that has a nominal power consumption of 1000W. The water is inside a one liter steel thermos flask. Be careful of course not to fill it up too much to prevent the boiling water of sparkling out of the flask.
Prosper Tauchsieder Real (image from galaxus.ch)
The water here has an initial temperature of 20°C (68F) and takes around 5 to 5 1/2 min to boil.
We successfully used the heater with different inverters. It also worked well on a relatively small model, like the Votronic 1200W and the 12V 200A Liontron battery without any issues.
There are even immersion heater models with lower power consumptions – often with a “portable” denomination. But of course it will then take accordingly longer to boil the water. But it might make sense if you have a smaller battery system or inverter. And there are DC models as well, that can be attached directly to a battery without an inverter at all.
But the main point for us was that this immersion heater just fits perfectly into the flask (after we removed the metal ring you can see on the picture). So after boiling, we can leave the water inside the flask without the need for an additional pot, and without having it to pour from one pot to the flask either.
The heater has a small plastic hook that it holds it in place. So it does not touch the bottom or any side of the flask.
After use the device is certainly hot, but it cools down quite quickly. If you use the water and empty the flask right away and do not have a proper surface on where to cool it, you can stick it back into the flask for cooling off.
And when not in use, the water heater takes nearly no space at all, or at least much less space than a normal electric water heater.
Two years ago, this water heater cost us roughly around 25 CHF. This is (today) around 25 EUR or 22 GBP. We got it from Galaxus, a swiss online shop. But we have no affiliation with it at all.
This model is called “Prosper Tauchsieder Real“, whatever this means. But as I said, there are plenty of different models out there.
Don’t forget to unplug the heater after use as it doesn’t have a sensor to detect when the water is boiling. The description however says, it has a dry detection feature. But I really never tried that out.
In one of our last posts we wrote about the upcoming, yet to be built, electricity setup in the vNext Car.
And now we changed our plans – slightly. Before deciding definitely for the Pylontech as the battery supplier, we thought we would install and test a comparable setup with both BYD and Pylontech.
Why did we do that? Having a look at the US3000C specs, we see that the recommended (dis)charge current is considerably lower than those from BYD (37A vs 65A). Of course, both batteries supply higher currents than that (74A vs 90A). But the cables sizes of the Pylontech box only supports a maximum of 2*100A, whereas the B-Box supports up to 250A. This maximum recommended current makes a difference when only having 2 batteries at your disposal, as the maximum surge current of the Victron MultiPlus II 48/3000 inverter is 5500W. So with Pylontech I can only support 2* 37A * 48V = 3552W without going over the recommended current and with BYD I can draw 2 * 65A * 48V = 6240W which is over the supported maximum of the inverter. So this is an advantage for BYD. Plus the overall capacity of BYD is higher (and comes at a larger weight).
Consequences and some calculation
But of course this has a drawback, as I want to use a DC Circuit Breaker with an integrated isolator, instead of a mains switch and a regular one-time fuse for the batteries. Most of the DC breakers only work up to a 63A and the larger ones are considerably more expensive.
On the other hand, the guarantee and fine-print with BYD declares indicated values are only achieved at a 0.2C rating, meaning that I could only constantly draw a 8000Wh * 0.2C = 1600W anyway, if I wanted to make use of the whole capacity (100% DoD).
Unfortunately I could find no C rating for Pylontech. However, in their warranty, Pylontech writes that the denoted values are only achieved when (dis)charging at 10A per battery (95% DoD). If I calculate this correctly, this would be an equivalent of roughly 2* 10A / (2 * 3374Wh / 51.2V) = 0.15C. In both cases the inverter should only much less than needed to support an induction cooktop and frankly any two devices at a time.
As a side note: Interestingly the B-Box seems to be cheaper per kWh than the Pylontech (as long as you stick with a single battery group).
So what does this mean?
In either case I will overrun the C rating of both batteries, meaning I will not get the full “official” capacity or life-time out of it. On the other hand, for our car installation this will not make much of a difference, as the Safiery Scotty DC-DC charger will recharge the batteries anytime when needed.
But when designing a complete off-grid system this will make a difference, as there we probably want to achieve a maximum amount of usable capacity and life-time.
But anyway, I will be making two installations and compare them in respect of the ISO25010 main product characteristic categories:
one installation with BYD Battery-Box LVS Premium 8.0 and
one with a pair of Pylontech US3000C batteries.
The B-Box has already been ordered. For Pylontech I am still awaiting a confirmation of the quote.
I keep you posted.
Update
Due to the difficulties of getting Pylontech batteries I had to skip the test and go straight for the BYD Battery-Box. See here for how it runs next to our caravan.
Pylontech Documentation as this does not really seem to be available on their website.
If you read the warranty card carefully, we see that the warranty extension from three to seven years has to be taken with a grain of salt. In addition, the replacement process (even to dead-on-arrive) is not
What does it take to run an off-grid Household on Wind and Solar only
Our plot in Caithness is not really what you would call developed. The next water line is 2 miles away, and the electricity lines just connect our distant neighbours to the grid.
When I made an enquiry with Scottish Power to get me a grid connection to my plot, I was quite surprised, that I would become the partial owner of the company. At least, this is what you could think, when looking at their price tag.
For the ridiculous amount of 35’000,00+ GBP I would get a grid connection to a single place on my plot. Any other point on the plot, stretching a couple of 100m meters, would have to be installed and paid separately.
This and the news of rising energy prices for the next couple of years made me think. There must be something else we could do, like installing a miniature nucelear power plant on my plot, of have perpetuum mobile generating all the power thatI would ever need.
With nuclear energy out of fashion, and expected Planning Permission to be very unlikely, I actually found the perfect couple of “perpetuum mobile”, seeming just perfect for what I would need. Wind + Solar.
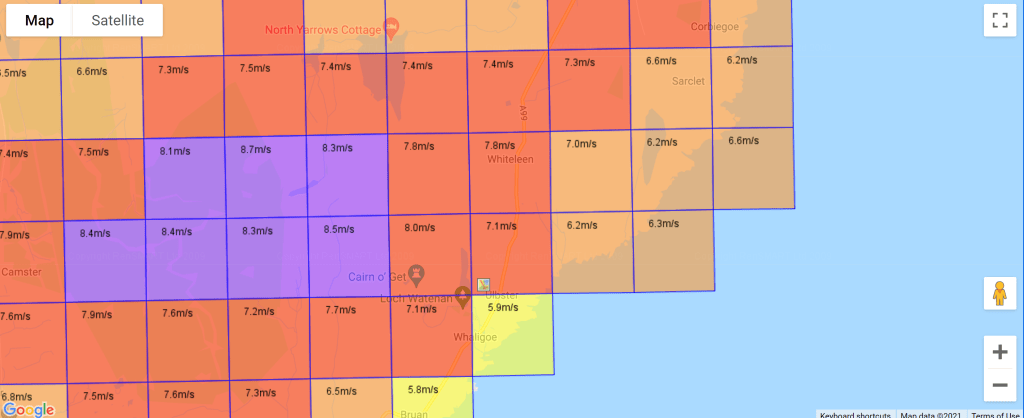
Located at the northern parts of the North Sea, near Wick, wind speed is excellent, as you can see from the map.
Wind Speed m/s @ 10m Height
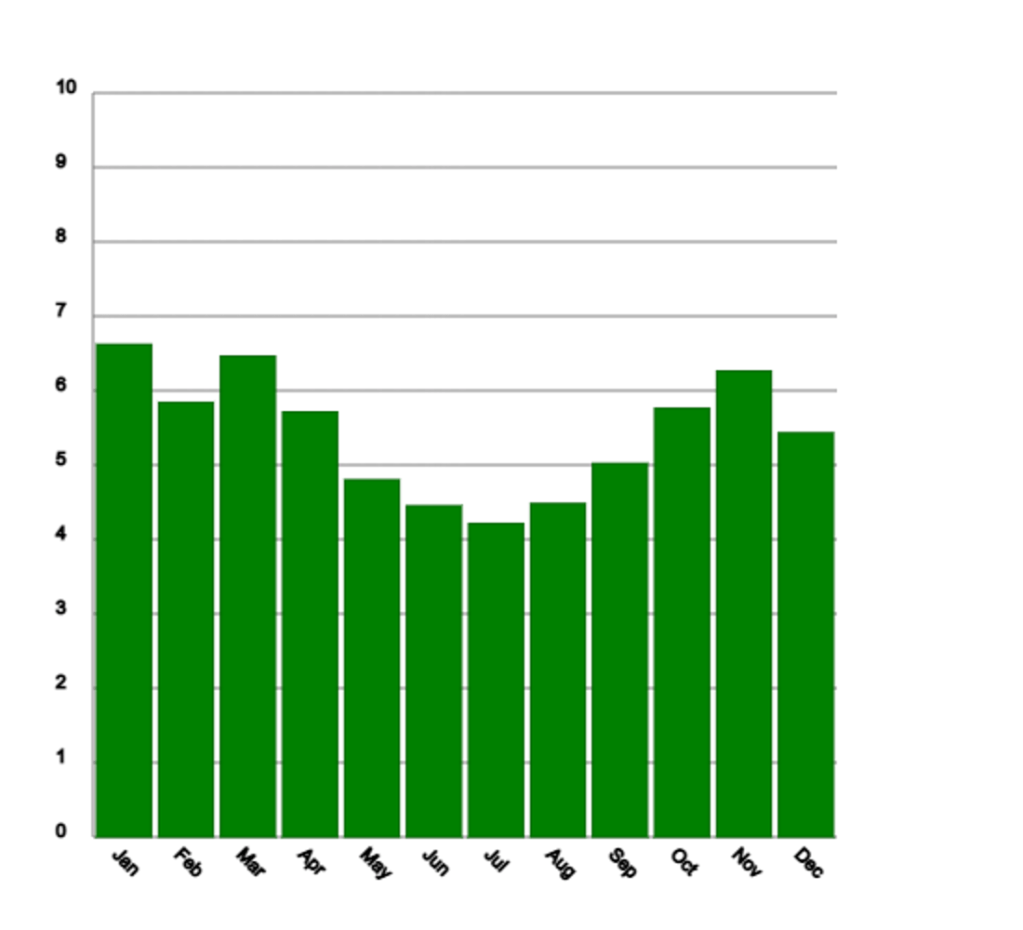
Distribution over the year shows, most of the wind is to be expected during autumn, winter and spring.
Wind Speed m/s per Year
Furthermore, the actual distribution of wind speed reveals, that 60% of all wind speed is in a usage spectrum for wind turbines:
Distribution of Average Wind Speed m/s
The problem however, in the summer months, there is probably not enough wind to sustain the amount of needed energy production. And the star of our solar system comes into play: solar power.
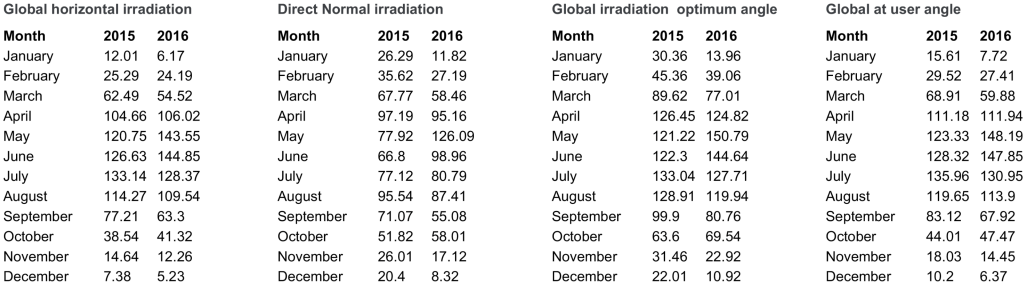
In numbers for the last years 2015 and 2016 that gives some really impressive values:
Local and Global Irradiation monthly kWh/m2
And as we can see from the curve, the sun just starts to shine more when the wind is more asleep.
According to UKPower a medium household in 2019 used 12’000kWh for Gas and 2’900kWh for Electricity, totalling in about 14’900 kWh per year.
This amounts to the following power consumption for a Medium Household:
kWh/year 1’4900
kWh/month 1’241.67
kWh/day 40.83
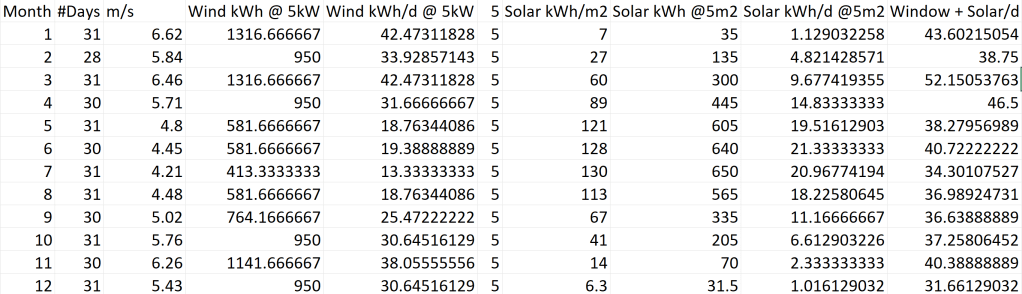
With some calcuIations from the wind and solar database, I figured out, that with a 5kW turbine and 5m2 of solar panels I could roughly produce this amount of energy over the year:
Power Generation from Wind + Solar with 5kW Turbine and 5m2 Solar
So as we can see, this is just not enough to produce enough energy on your own. But it looks very promising. With more Solar, a larger turbine (or more turbines) or just a backup generator this could easily be addressed.
Regarding backup generator. Of course, energy sources like wind and solar are not stable, so we would have to have some battery storage capacity anyway.
A storage capacity for a single day in 3.2kWh blocks would cost roughly 22’500,00 CHF (list price for a Pylontech US3000). Adding the turbine with 40’000,00 CHF, solar panels 5’000,00 CHF and inverters 20’000,00 CHF you easily end up with a total price of 80’000,00 CHF – 100’000,00 CHF.
Electricity costs of roughly 3’500,00 CHF – 4’000,00 CHF per year will take a 25 years to pay off – if at all. And if the energy prices rise (as heard, by 50%), it would still need a 15+ years to reach a break even.
So what does this mean? There is no perpetuum mobile? And better use the grid and pay as you consume?
Probably not. Betting on higher energy prices, rising inflation, smarter and more efficient technology in the future and outages ocurring more often and often, this could really payoff much earlier than one would think.
Plus, it can be taken as an example, that it might actually be possible to produce your own energy without being dependent on anything else than wind and sun.
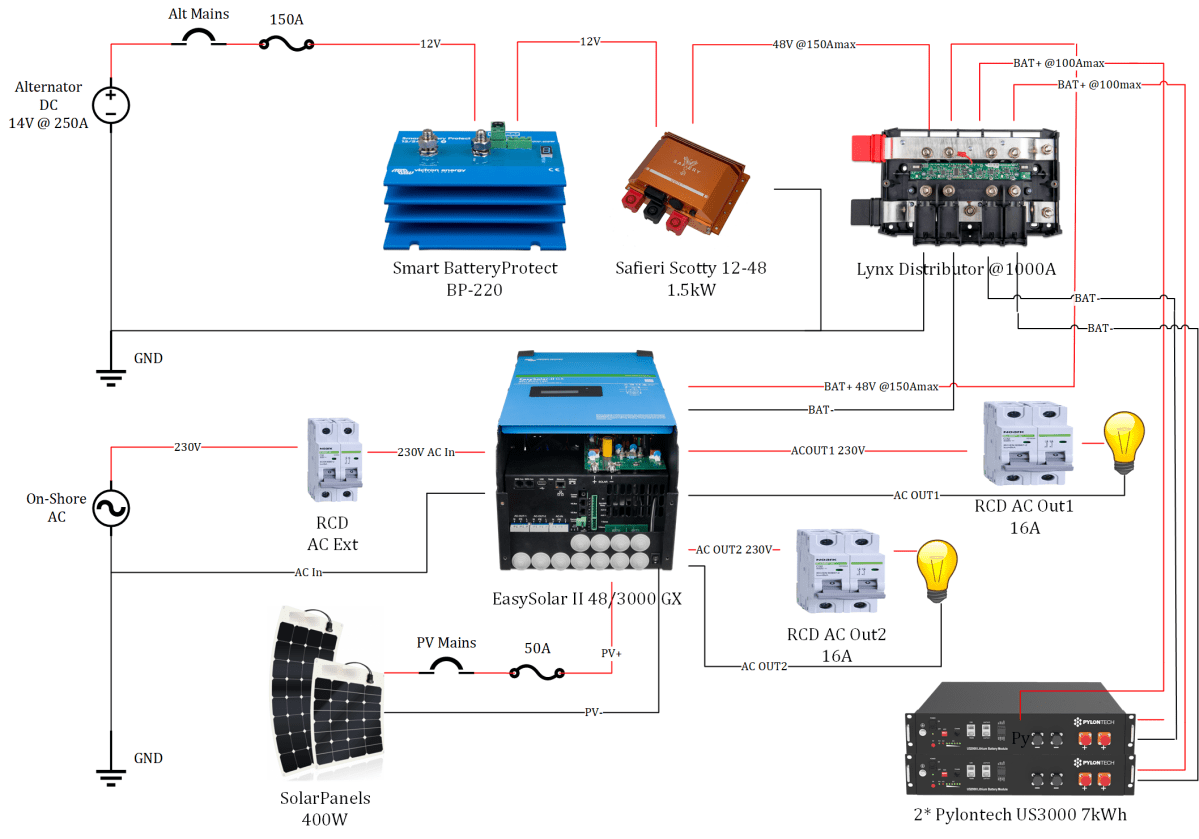
48 system in a car and running everything from AC.
We are getting ready for our next car. Or at least start thinking about it. Roughly, we want something like a MB Sprinter (short version, normal roof) and built the interior ourselves. And of course, when doing this, electricity is one part of it.
In this post we give a brief explanation of our requirements, use cases and possible solutions we came up with.
Storage capacity in our existing Toyota is 5’120Wh brutto with two Liontron 12V @200Ah batteries costing around 1’990,00 CHF, which makes 0,77 CHF / Wh. For our next van we would like to increase the storage capacity and the larger inverter, but keep cost down if possible. Currently we use 35mm2 cables to run our 1’200W inverter, so to run a larger inverter we would have to increase cable sizes in our system significantly – or increase voltage size.
After some thinking, we opted for a 48V system (rather unusual for a car) with two Pylontech Us3000 batteries summing up to a net capacity of 6’400Wh. Considering the price for the batteries (arund 1’730,00 CHF each) this would lower the price to 0,54 CHF / Wh. With this capacity we could run an 3000VA / 2400W inverter and cable sizes could then even stay the same.
However, the main problem with that setup would be to get 48V from a 12V alternator. But luckily, we are not the first tasked with this problem and Safiery has a solution just for that: Safiery Scotty 12V-48V DC/DC converter at different power levels (1000W, 1500W, 3000W). As the car engine would have a 250A alternator, the setup could really benefit from even the largest model. Ideally the DC/DC converter would be installed in the engine compartment, in order to minimise the relative voltage drop on the way into pssenger area.
As we currently do not have a fixed solar system, this is definitely something on our wishlist. But with that large DC/DC inverter and the fact that we are not staying for days at a single spot without moving the van, the initial cost for 400W solar panels just do not seem to be justified. So, we thought we prepare everything, so we can later still install solar panels without having to redo a lot of installation work. Enter Victron Energy EasySolar-II 48/3000/35-32 MPPT 250/70 GX. Now, how does this roll of the tongue?
But in fact, that system really looks promising: in a H 499mm x W 268mm x D 237mm box at a weight of 26kg, you get
a 3000 VA inverter,
250V/70A MPPT solar charger,
two AC out 230V @13A,
a communication controller (GX) with Can bus. USB, network connections (wired, wireless),
a 230V AC/DC battery charger with a 35A DC output (rather small),
programmable relays;
everything to be monitored and administered via a tablet,
options for future expandability such as LTE and GPS exist.
Considering, both the Scotty and the US3000 also have a CAN bus interface, this really make a neat paclage, as all devices are able to talk to each other. More bang for the buck.
At least in theory. As I have not built it yet. But I think, this is a good starting point. I will contact the vendors to get a response if my setup is supported and if there are any reference installations on it.
Now you might wonder, how I would charge my other 12V devices, as I do not have a single 12V output in the setup. And yes, I thought about this too, and came to the conclusion: I do not need 12V output. Or sort of.
Compressor, winch etc I will power from the alternator directly. All the rest I will power via AC, such as the fridge, mobile, USB, notebook. This of course, comes with a penalty, as I have to convert the energy twice. But this also saves me an additional device and a lot of cabling and extra fuse boxes (and this is all saved space).
Now about the weight:
the inverter I already mentioned 26kg: EasySolar-II 48/3000 GX
64kg: 2* Pylontech US3000
plus additional devices, such as 12V/48V DC/DC converter, bus bar, fuses, cables,
future solar panels would come on top (no pun intended).
The van (2-seater) has a total loading capacity of 1080kg, so I think this is a justifiable weight for a pretty massive power system.
For connection of these systems, I opted for a bus bar with integrated fuses, the Victron Energy Lynx Distributor, though a back-to-back-cabling with extra fuse boxes would also have worked.
In case, the interaction with Safiery, Victron and Pylontech via CAN bus does not work out as expected, I would insert a Smart BatteryProtect BP-220 in front of the Scotty, so I can switch the converter on and off depending on the ATD and ATC signal in the EasySolar via a relay.
System diagram: Van Electricity
So these are my plans for the next van. I am curious, what response I get from the vendors and how it all works out.
In case you have questions or recommendations for improvement, I am more than happy to hear from you.